
Discover all the affiliate secrets from the mVAS perspective!
Affiliate marketing from Beginner to Advanced
-
Part 1 - The basics of affiliate marketing
-
Part 2 - The affiliate network
-
Part 3 - Tracking Lessons
- Intro
- Adding Golden Goose network to your tracker
- Adding Golden Goose offers to your tracker
- Placing a Global Postback
- Placing postbacks for individual offers
- Adding landing pages to your tracker
- Adding Traffic sources to your tracker
- Building a campaign in your tracker
- Configure traffic back Campaign URL
-
Part 4 - Market Research and landing pages
-
Part 5 - Pop Traffic
-
Part 6 - Push Traffic
-
Part 7 - Additional Resources
Placing postbacks for individual offers
You can also set the postback URL per each offer. I don’t recommend it because you need to repeat this process every time you want to promote a new offer, but I’ll explain how to do it here as there might be some cases where you will want to use this feature.
A few cases that come to my mind right now are:
- If you’re using more than one tracker, you will have multiple postback URLs. In that case you might have to set up individual postbacks for each offer that isn’t being promoted with your main tracker.
- Sometimes you have multiple domains added in your tracker to run offers in different geos or verticals. Most trackers handle multiple domains well and you can still set a general postback, however, some trackers have issues with this and it’s better to have the postback URL within the same domain as your campaign URLs.
- Another case I can think of is if you’re testing an individual offer without a tracker, just direct linking from the traffic source to the affiliate network. In that case, you’ll need to set up the postback URL from your affiliate network instead of your tracker.
There might be more cases where you need to set up individual offer postback URLs. However, I reckon you probably won’t need it if you’re a beginner, so don’t worry too much about it.
Important Note: If you set a global postback and another individual postback in the offer with the same URL it could cause issues and your tracking might not work correctly at Golden Goose. Always use a global postback only if possible unless you need an exception like the ones mentioned above.
Let’s check out how to set postback URLs for individual offers.
Repeat the process on Voluum to get your postback URL as we did with the global postback.
Now go back to your Golden Goose tab where you built the offer URL and scroll down to the “postback URL” area and paste your postback there:
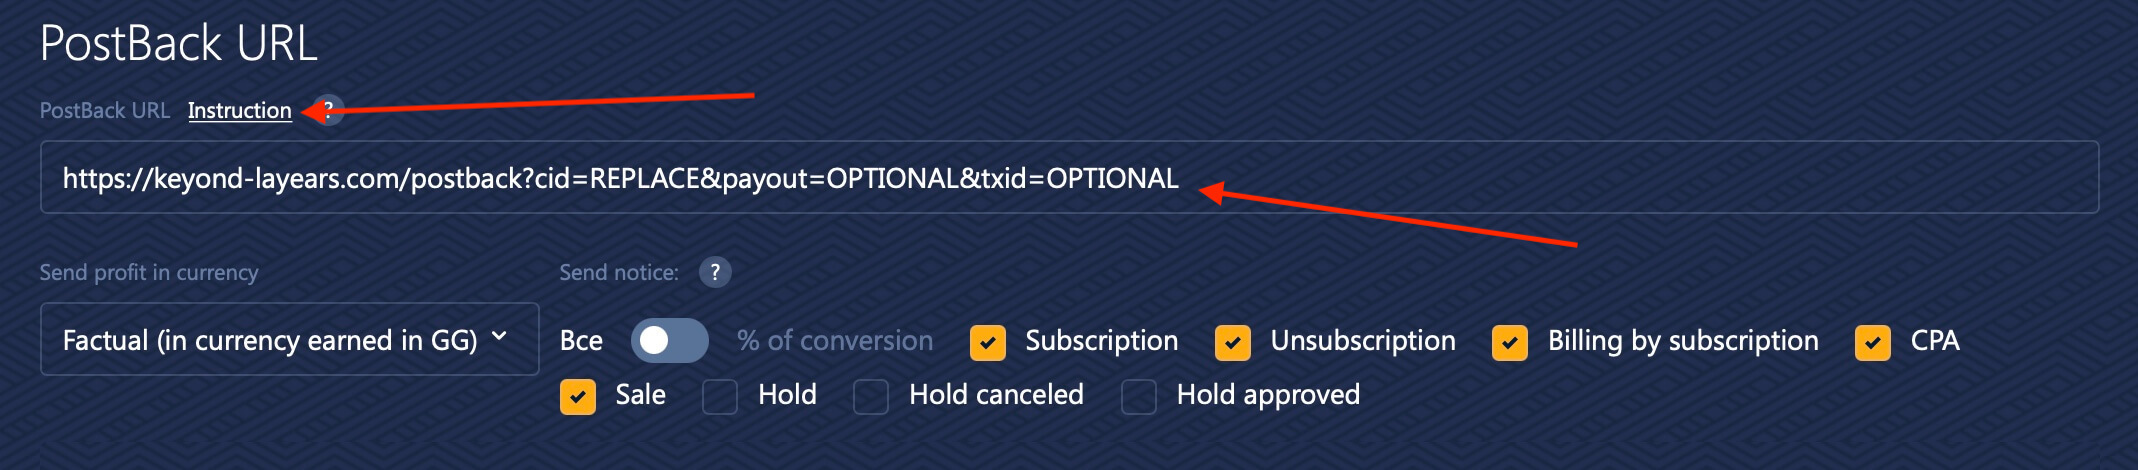
Now we need to edit a few things in the postback as well. The easiest way is by clicking the instruction text right above where you pasted the postback URL. A new dropdown menu will appear. Scroll down to the Voluum postback example and copy the last part of it:

Now go back to the postback URL you just pasted above and replace everything after cid= with the text you just copied. It will look like this, but your tracker’s domain will be different:

That’s it! Now just scroll down and click “Finish” and you’ve finally added an offer on your tracker and connected it with the affiliate network.
Let’s move to the next step.
Search
 Searching...