
Discover all the affiliate secrets from the mVAS perspective!
Affiliate marketing from Beginner to Advanced
-
Part 1 - The basics of affiliate marketing
-
Part 2 - The affiliate network
-
Part 3 - Tracking Lessons
- Intro
- Adding Golden Goose network to your tracker
- Adding Golden Goose offers to your tracker
- Placing a Global Postback
- Placing postbacks for individual offers
- Adding landing pages to your tracker
- Adding Traffic sources to your tracker
- Building a campaign in your tracker
- Configure traffic back Campaign URL
-
Part 4 - Market Research and landing pages
-
Part 5 - Pop Traffic
-
Part 6 - Push Traffic
-
Part 7 - Additional Resources
Launching a pop campaign on PropellerAds
First, you’re going to need a PropellerAds account. You can sign up here.
After your account is approved and you provide your IDs or credentials (many traffic sources require this lately) you’ll be able to go to your dashboard.
Before launching your first campaign, you need to add funds. Go to the Add funds tab and select your preferred payment method. The minimum deposit amount is $100, but if you want to learn how to run CPA offers I recommend you to set aside at least $500-1,000 and learn from just one or two different traffic sources. PropellerAds is one of the best so far.
After you’ve added money to your account, please visit the “Traffic Chart” menu to get an idea of the traffic available for the geo and device you want to buy traffic from.
Select the OnClick (PopUnder) option, and then choose a platform and OS you want to target. PropellerAds will show you the total impressions available based on the last 24-hour stats.

You will also be able to check the average and max CPMs to get an idea of how expensive the traffic is. Keep in mind CPM means cost per thousand impressions. So, if the CPM is $1, you’ll be paying $1 for one thousand visits or $0.001 per impression.
It’s time to create a campaign!
Click the “create campaign” button at the top of your dashboard and you’ll see a new menu. Here you need to fill up all of your campaign details such as name, ad format, filters, etc.
Let’s go over each step. The first part requires you to choose the name, ad format, campaign URL (from tracker), and traffic options:

When launching a campaign, you can choose Direct Click. It is a new traffic type which consists of parked domain and top converting ad placements traffic.
Direct Click can be compared to Whitelist to some degree, as sources are limited and tied to the quality, so I recommend using it for quick tests without any extra effort and expense.
Direct Click is worth more due to its quality. But you will notice that you’ll require less traffic per zone to evaluate its performance.
In the target URL, make sure you include your campaign URL from Voluum or your favorite tracker, as explained in the tracking section. Also, I recommend you select PropellerAds traffic only while testing campaigns and disable broker’s traffic. Leave that for a later stage if your campaign has the potential to be optimized.
As for the pricing model, I recommend testing with Smart CPM or CPA Goal. Smart CPM is the easiest way to get started as you know how much you’re going to be bid (max) for your traffic.
You can also set a frequency cap by impressions and I recommend you to set it to one or two impression every 24 hours.
Now you will need to set the targeting options, including countries, bids, and budgets.
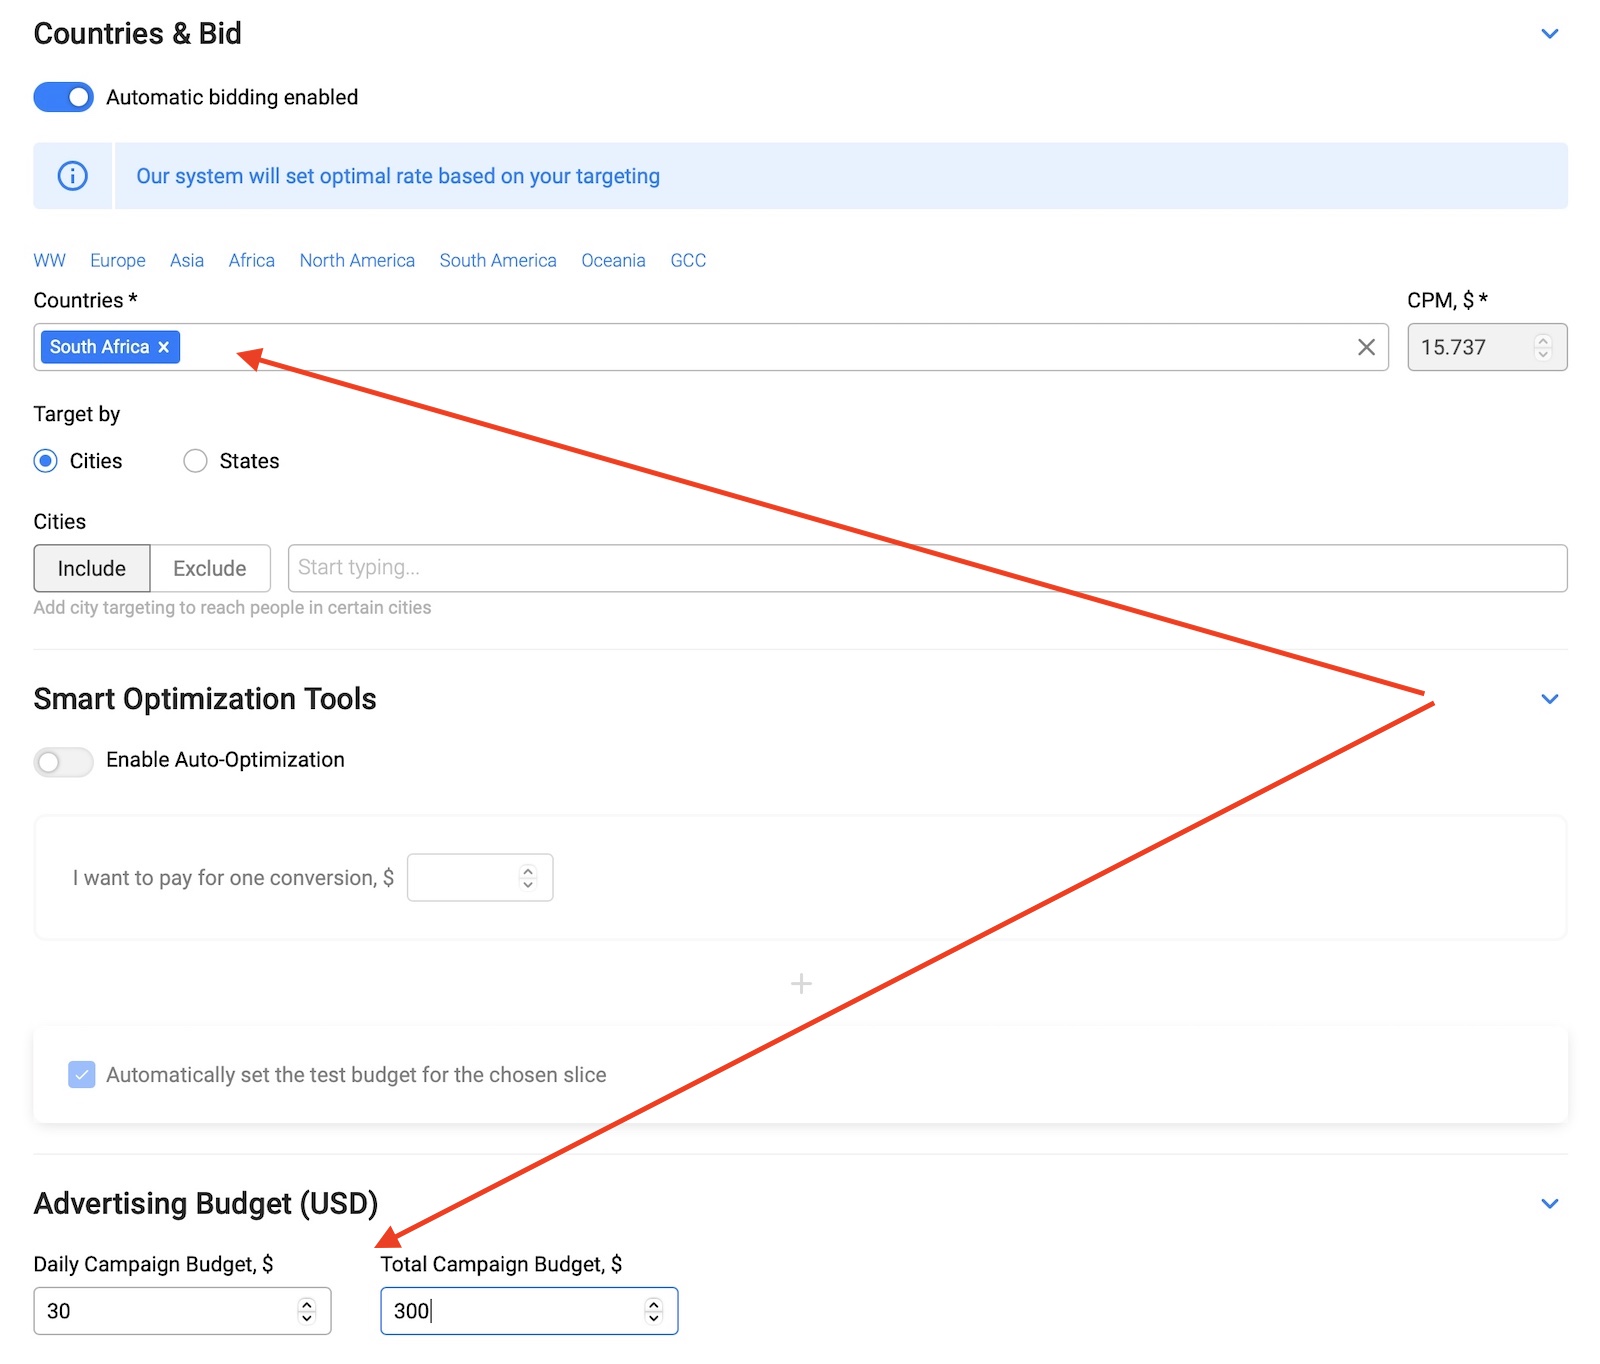
Setting a daily budget is important because you don’t want to overspend while testing offers. I recommend you to get started with 10x your offer payout when running pop traffic and then adjust your numbers later.
For example, if the offer you’re testing pays $1, then set a $10 daily budget. Also, you can set a total budget but I just leave it unlimited or set a very high budget such as $10,000 and forget about it. You can always pause your campaign later if it doesn’t work or increase/decrease the budget.
As for the CPM or bid, leave it as is right now. First, we need to fill all the targeting settings, and later we will come back to set a CPM.
Let’s scroll down to the targeting settings:
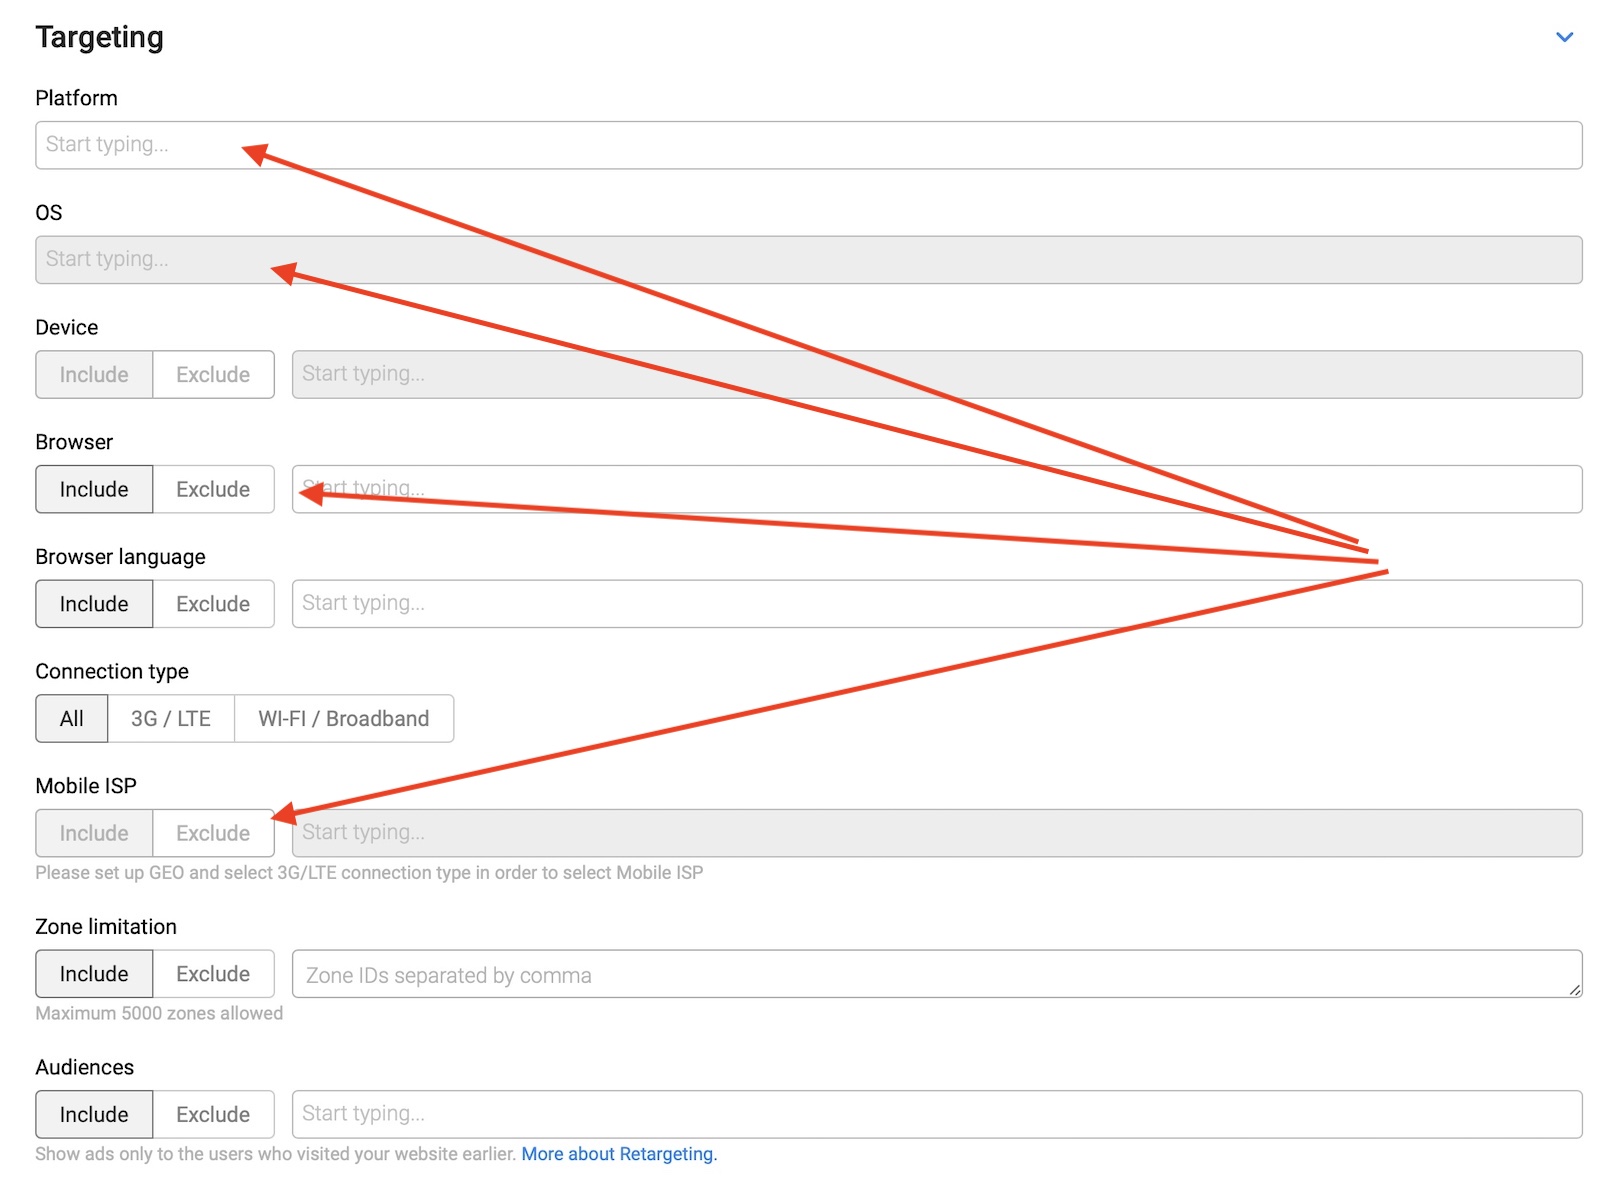
Here, you need to select the platform (mobile or desktop) and after that, you can go over the OS, browser, connection, and other filters.
It’s important to mention here that you should always separate your campaigns by devices and even OS if possible. The CPM of mobile vs desktop traffic is very different. And sometimes the CPMs between Android and iOS or Windows vs. Mac OS are very different as well.
Separating your campaigns by device and OS will also help you optimize later with fewer variables.
Another thing I want to mention here is the ability to see in real life the average estimated traffic and bids in the right chart of your campaign’s dashboard.
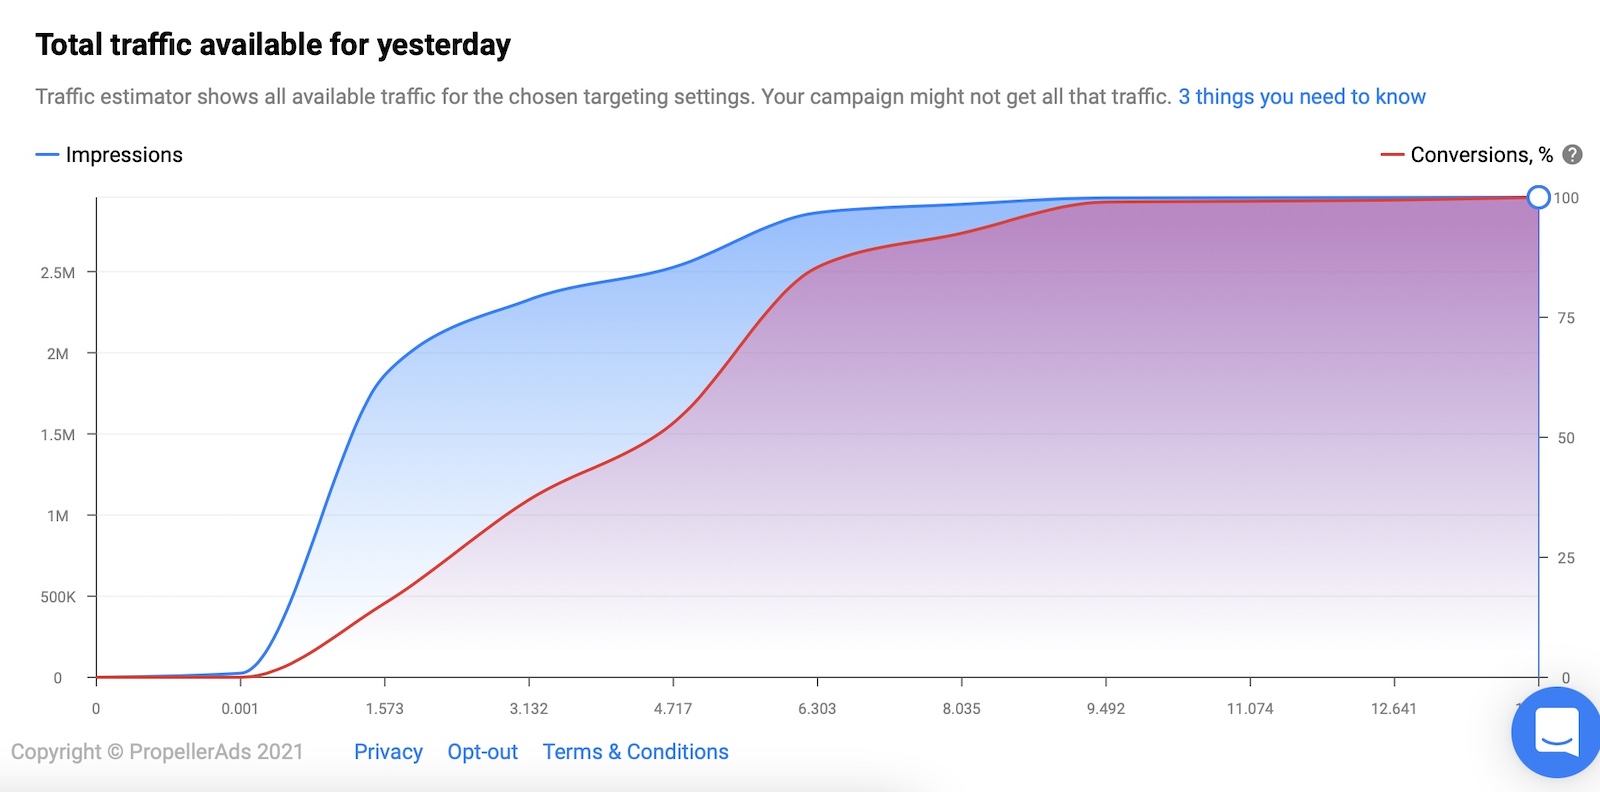
This chart is very useful because once you have set all your filters you can go back and set your CPM based on the chart. Ideally, you want your CPM to be at least as high as the average, if not a bit more. Choose a bid that gets you the majority of the traffic without being the highest.
Finally, you can’t include or exclude any zones at this moment because it’s your first campaign, however, after buying some traffic you will be able to start blocking zones. A zone equals a website.
When you buy pop traffic from an ad network you get traffic from hundreds or even thousands of websites and you need to block the ones that are not converting or are not profitable for you.
But for now, let’s keep it empty and move to the final section:

In this area, you can collect audiences for retargeting and other purposes. This isn’t a beginner-friendly feature, so just leave it like that and you’ll learn how to use it later.
Also, you can set a campaign schedule to buy traffic at certain hours only, but again, this is something I’d leave alone until you have any data to optimize.
Accept the quality guideline terms and click the “start campaign” at the bottom of this menu. That’s it! Your campaign will be sent to moderation. PropellerAds is very fast and it takes a few minutes to a couple of hours to approve campaigns in most cases, but sometimes it can take up to 48 hours.
Once your campaign is approved you will start getting traffic and you can check the stats in your tracker.
Search
 Searching...