
How to Send a Test Conversion to a Tracker?
Recently, we’ve added the Test Conversion functionality to the Golden Goose platform. With its help, you can make sure that your tracker will pick up the conversions from your Golden Goose campaigns and provide you with detailed stats on your run. Let’s find out how to use this new feature.
Menu
- Creating an Affiliate Network in Keitaro
- Sending a Test Conversion to any Tracker
- Sending a Test Conversion to Binom
- Sending a Test Conversion to Bemob
- Sending a Test Conversion to RedTrack
Postback is a mechanism used to transfer data about events, such as conversions, from one server to another. In affiliate marketing, postback helps automatically inform the tracker about important events, such as purchases, subscriptions, or other targeted activities.
Creating an Affiliate Network in Keitaro
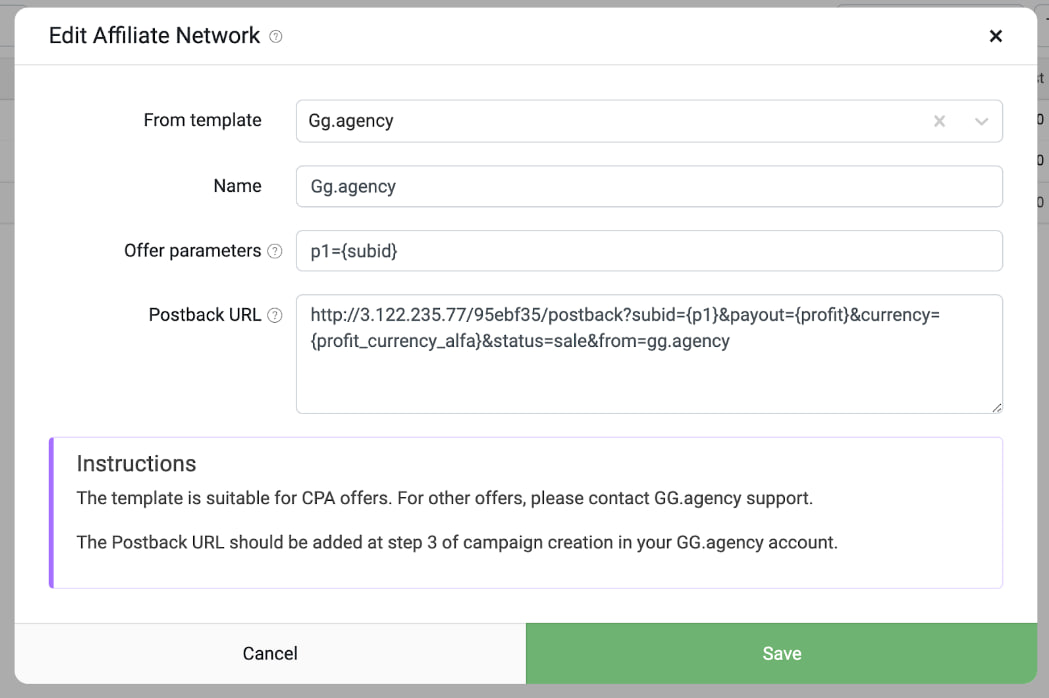
- Go to the «Affiliate Network» tab and click «Create.»
- In the «From Template» field, choose «Gg.agency.» The settings will be automatically filled from the template.
- Copy the link from «Postback URL» and paste it into the third step of creating a campaign in GG.
Example Postback URL: http://3.122.235.77/95ebf35/postback?subid={p1}&payout={profit}¤cy={profit_currency_alfa}&status=sale&from=gg.agency
In this case, GG will send the following parameters to the tracker:
- payout={profit} — the payout amount for the event. {profit} is replaced by the actual profit that needs to be sent.
- status=sale — the event type is a confirmed sale, corresponding to the redeem event in GG.
- subid={p1} — the unique click identifier.
- currency={profit_currency_alfa} — the payout currency.
- from=gg.agency — the affiliate network name.
This template is relevant for CPA offers and allows you to track profit in the campaign tracker.
For rebill offers, where more events need to be tracked, you can use the following example: https://domain/key/postback?payout={profit}&status={event}&subid={p1}&lead_status=subs&sale_status=redeem,rebill&rejected_status=unsubs&tid={event_id}¤cy={profit_currency_alfa}&from=gg.agency
This postback will include additional parameters:
- status={event} — contains the event from GG (e.g., redeem, rebill, etc.). These events are not standard in Keitaro, and extra parameters are used for their correct processing.
- lead_status=subs — indicates which event from GG (in the status parameter) should be considered a lead (unconfirmed sale). For example, if status is «subs,» Keitaro will interpret it as a lead.
- sale_status=redeem,rebill — specifies GG events that Keitaro should consider as sales. In this example, if status is redeem or rebill, Keitaro will treat it as a sale. This is necessary to track not only regular sales but also rebills that come later.
- rejected_status=unsubs — indicates events that should be considered cancellations or unsubscribes. If status is «unsubs,» Keitaro will treat the event as canceled or unsubscribed.
- tid={event_id} — the unique event identifier (e.g., transaction ID or other event ID). Upsells/rebills are recorded in the tracker when the tid parameter is received in the postback.
How Postback Works:
- Receiving Events: Postback is sent each time an event occurs on GG’s side (e.g., redeem, rebill, subs, unsubs).
- Event Type Identification: The event is passed in the status parameter. Keitaro doesn’t recognize these specific GG events, so they need to be mapped to those that Keitaro understands (e.g., lead, sale, or rejection).
- Event Matching:
- If status is «subs,» Keitaro will interpret it as a lead due to lead_status=subs.
- If status is «redeem» or «rebill,» Keitaro will recognize it as a sale through sale_status=redeem,rebill.
- If status is «unsubs,» Keitaro will recognize it as a rejection through rejected_status=unsubs.
- Recording Events in Keitaro: Once Keitaro recognizes the event, it is logged in the system, with details like payout, currency, subid, and other parameters attached.
This postback allows sending GG-specific events to Keitaro, where they are properly processed as leads, sales, or rejections.
Creating a Campaign in the Tracker
- Go to the «Campaigns» tab and click «Create.»
- Next, create a Flow.
- Set up a simple Flow that redirects to the Golden Goose campaign link when the user clicks the campaign link in the tracker.
- Go to the «Schema» tab and choose «Direct URL.»
- Leave the redirect type as «HTTP-Redirect.»
- In the «URL» field, paste the Golden Goose campaign link and click «Apply.»
- For the postback to work correctly, the URL must include at least a unique click identifier: p1={subid}.
Testing the Setup:
- On the third step of campaign creation, click «Test Conversion.»
- Paste the tracker link.
- Click «Send Test Conversion.»
If the setup is correct, you will see the message: «Great! Conversion sent to the tracker.» The conversion information will appear in the tracker’s statistics.
In the first section of this article, we will cover the common principle of sending conversions to a tracker, without being tied to a specific one. In order to learn how to set up a particular tracker, please refer to the the Contents above or just scroll down.
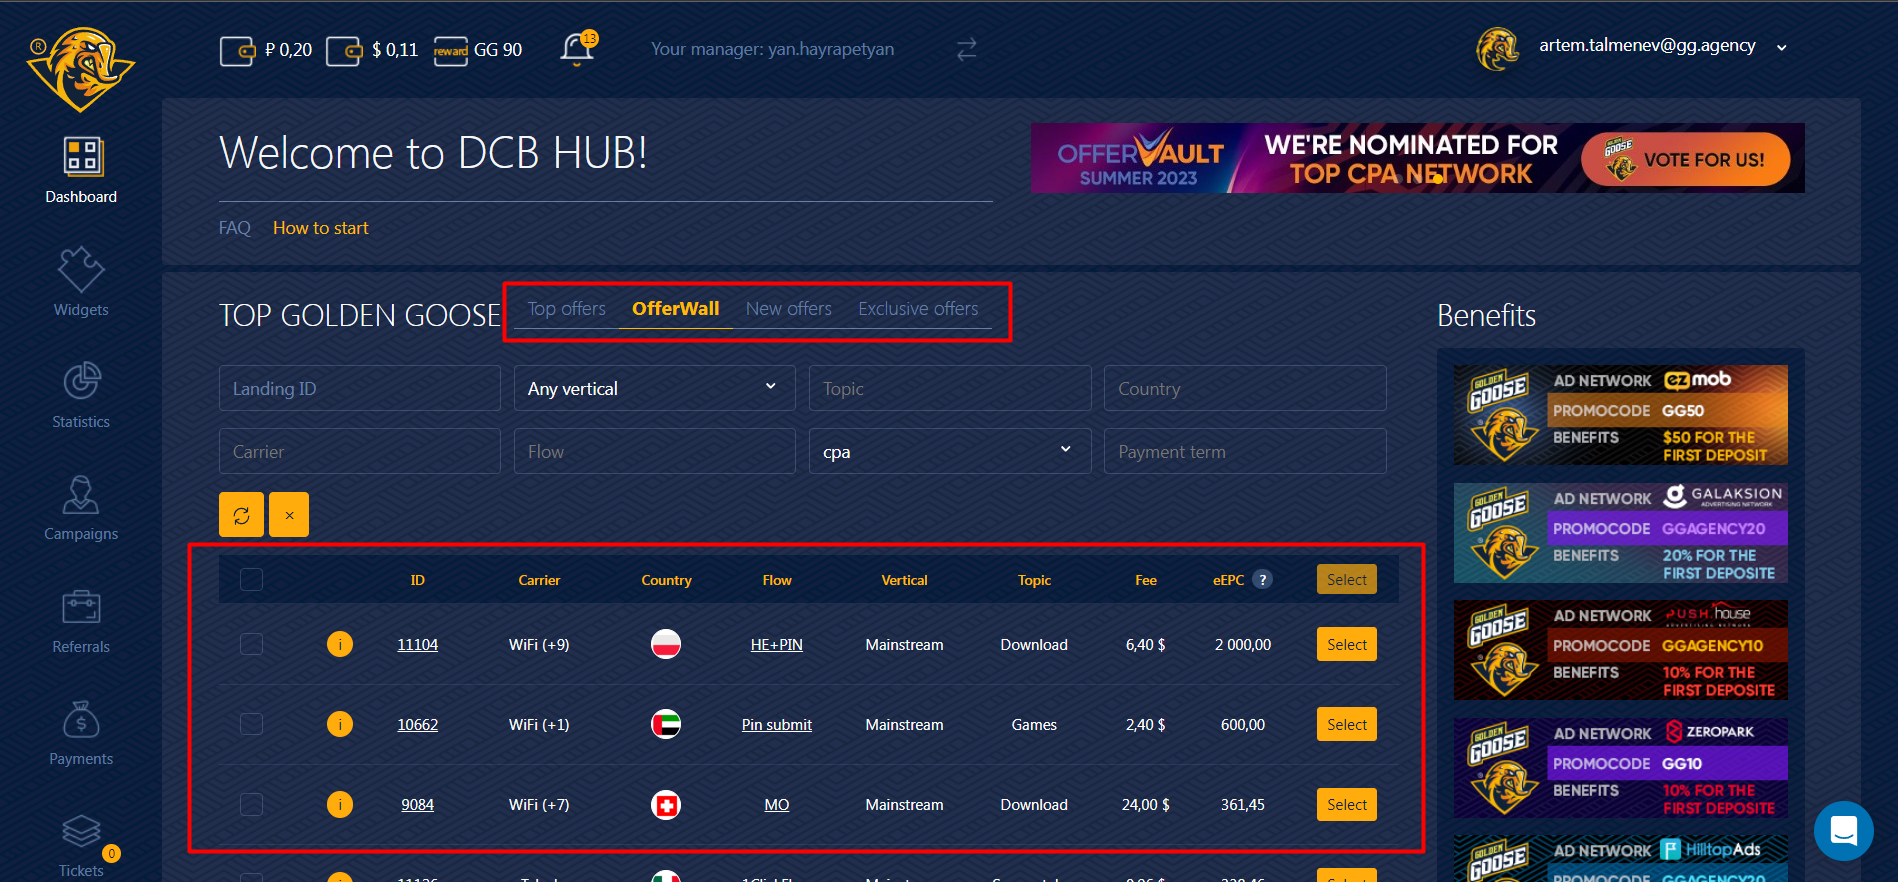
To test out the conversion sending to a tracker, you must first create a campaign at Golden Goose:
Step 1. In the Golden Goose Dashboard, create a campaign for the slected offer:
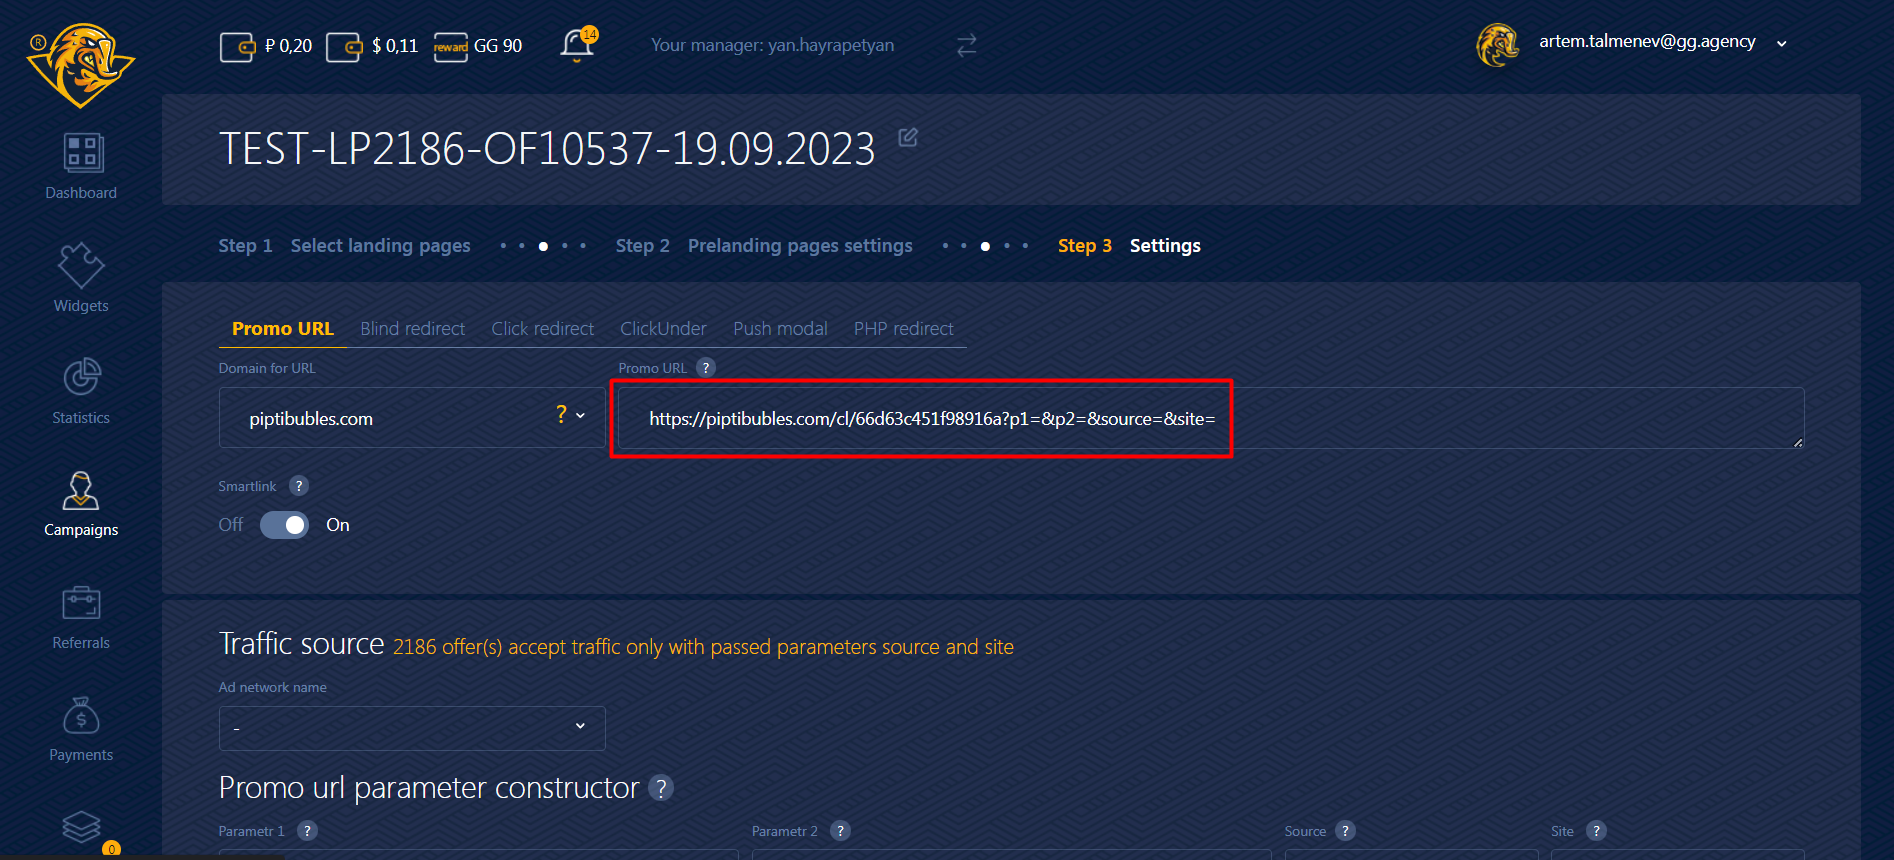
Step 2. After creating a campaign, go to Step 3 in its settings:
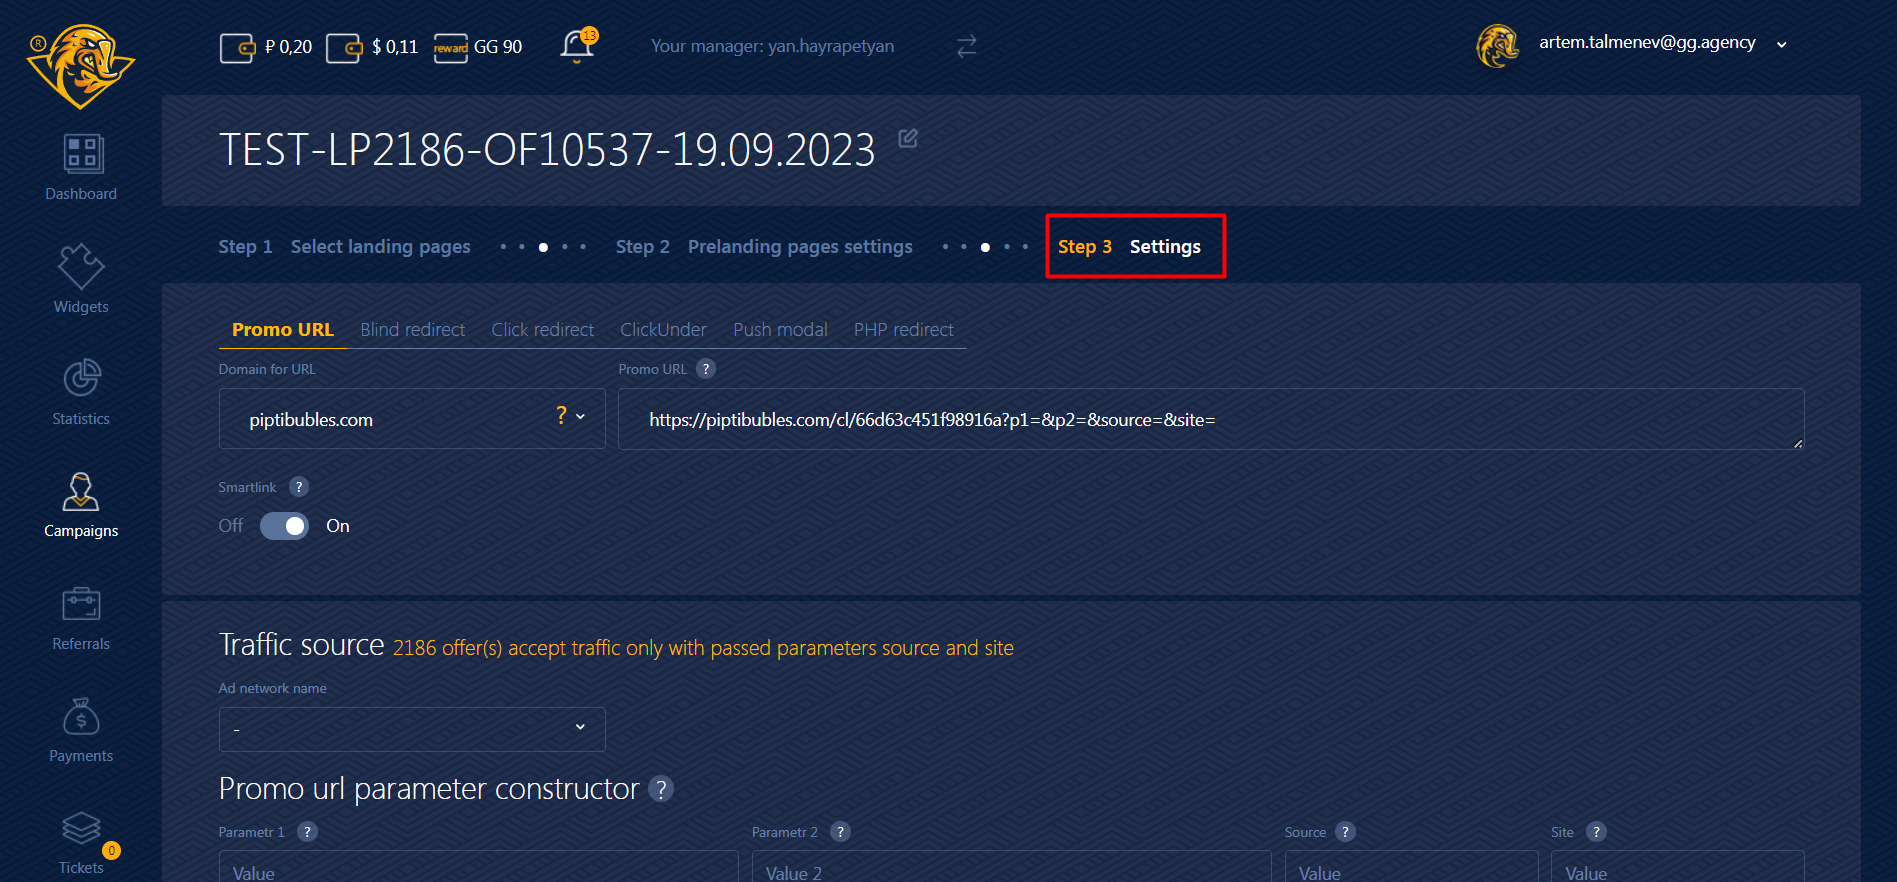
Here you need to copy the Promo URL of the campaign, which you will need later:
Step 3. Next, in the tracker you are working with, it is necessary to specify the traffic source. For example, it can be PropellerAds.
Step 4. In the tracker, find the traffic source section, and specify:
- Source name.
- Postback URL. For instance: http://ad.propellerads.com/conversion.php?aid=3333333&pid=&tid=123456&visitor_id=${SUBID}&payout=${PAYOUT}
- Sometimes, the tracker already has built-in integration with the source. All you have to do is select your source, and save your selection.
Step5. Next, you need to create a campaign in the tracker in which you specify:
- The traffic source you created earlier.
- Promo URL copied from the created campaign.
Step 6. The next step is to create an offer and the offer source. Find the «Offers» tab, and when creating it, specify:
- Offer name.
- Promo URL from a previously created campaign at Golden Goose.
Step 7. After you have specified the traffic source and added the offer, you need to create a campaign in the «Campaign» section. Here you need to specify:
- Campaign name.
- The price — some trackers support the Auto function, but for the test you can set it to 0.
- Select the traffic source added earlier.
- Select the offer added earlier.
Step 8. After creating a campaign, you need to take the URL of the campaign you created. This link conveys information about the click.
Step 9. You also need to find your Postback URL which is provided by the tracker.
Step 10. After all the steps above, go back to Golden Goose, paste the Postback URL into the appropriate field in Step 3 of the campaign, and add the following parameters to this link:
- {p1} is a mandatory parameter responsible for passng the clickid.
- {profit} is a mandatory parameter responsible for passing the bid.
- The link should end up looking something like this:

- Attention:
- The domain in the link will be the one you have registered for the tracker.
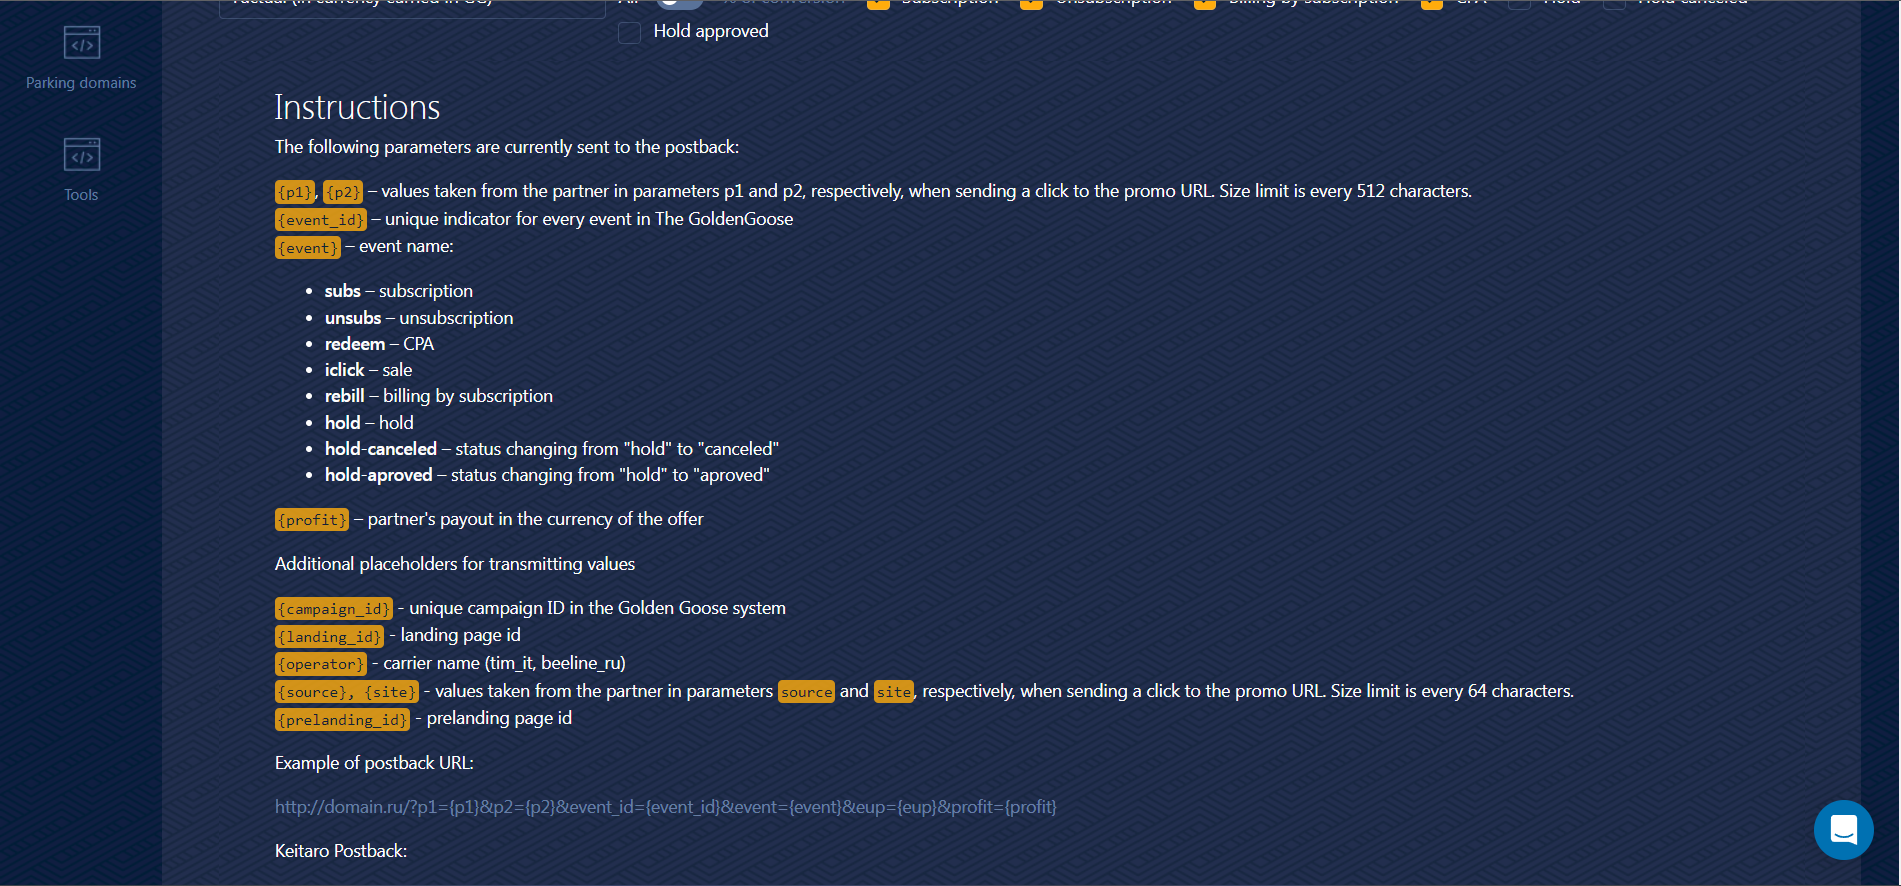
- Along with the {p1} and {profit} parameters, you can pass other optional parameters. Check your tracker’s instructions to learn how to track other campaign parameters, and see our instructions for setting up the parameters:
Step 11. After inserting the Postback URL, click the Test conversion button and the Test conversion field will open. In this field, insert the URL of the campaign:

Step 12. Once you have inserted the Postback URL, set the parameters {p1} and {profit} and inserted the campaign URL, click on Send test conversion. If everything is fine, you will receive a positive notification.
If something went wrong, you will get a negative notification. Double-check the links you inserted again. Possible causes:
- The Promo URL you inserted into the tracker is not the same as the one in the Golden Goose campaign.
- You put the {p1} and {profit} parameters at the wrong places in the Postback URL link.
- You made a mistake when copying the campaign URL from the tracker to the Golden Goose campaign.
Step 13. After a successful submission, you need to wait a while for the conversion to reach your tracker. This usually takes up to 10 minutes. If everything is set up correctly, you will see the conversion in your tracker.
Please note: In this section, we’ve only covered sending a test conversion to verify that the tracker and campaign are set up correctly at Golden Goose.
For more in-depth traffic analysis and broader statistics transmission, you need to have an understanding of the tracker’s instructions and perform a more detailed configuration.

To test out the conversion sending to the Binom tracker, you must first create a campaign at Golden Goose:
Step 1. In the Golden Goose Dashboard, create a campaign for the slected offer:
Step 2. After creating a campaign, go to Step 3 in its settings:
Here you need to copy the Promo URL of the campaign, which you will need later:
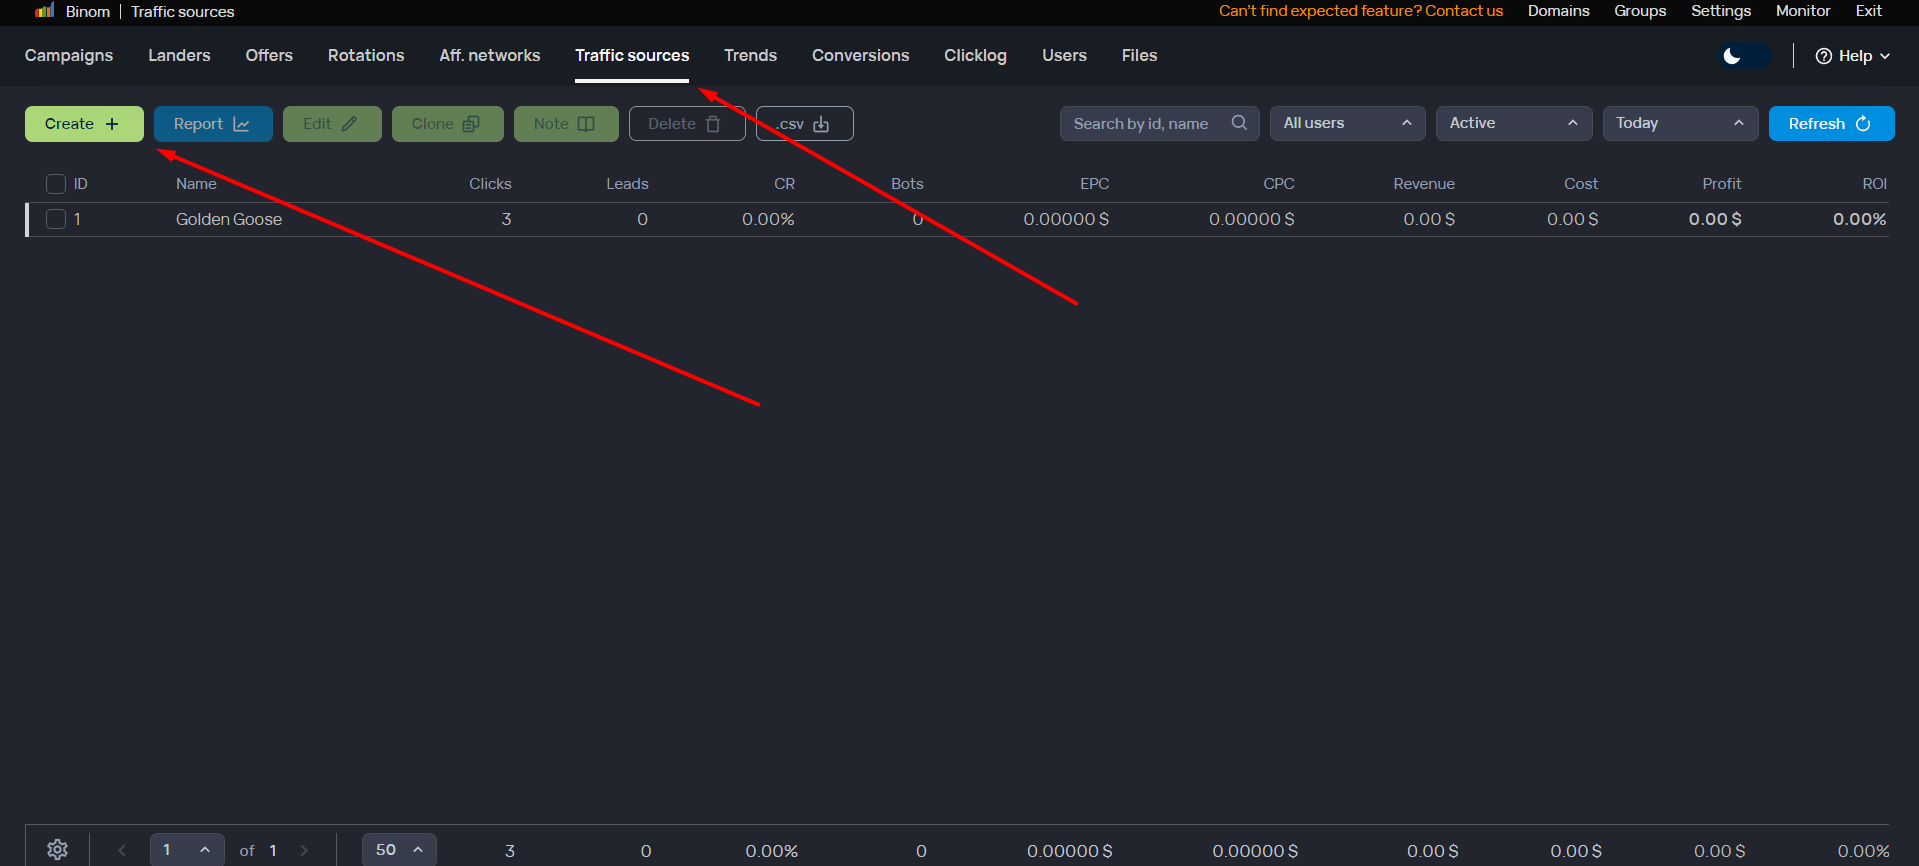
Step 3. Next, go to Binom, and start by creating a traffic source. Let’s use PropellerAds as an example:
- Go to Traffic sources, and click the Create button:
- In the window that appears, enter the name of the traffic source, and also insert the Postback URL from PropellerAds:
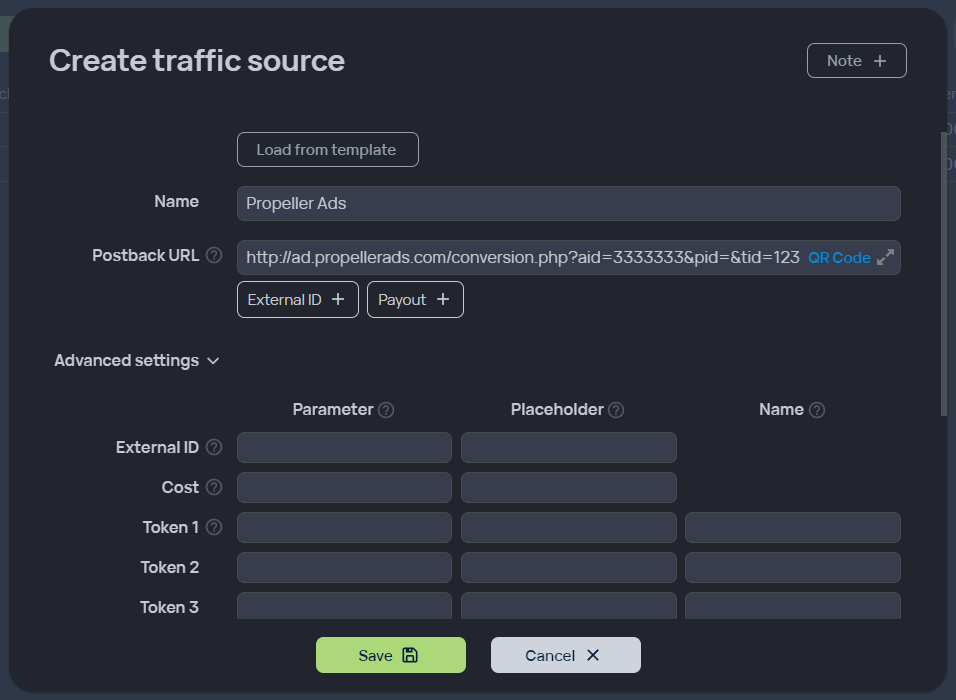
- Save this traffic source.
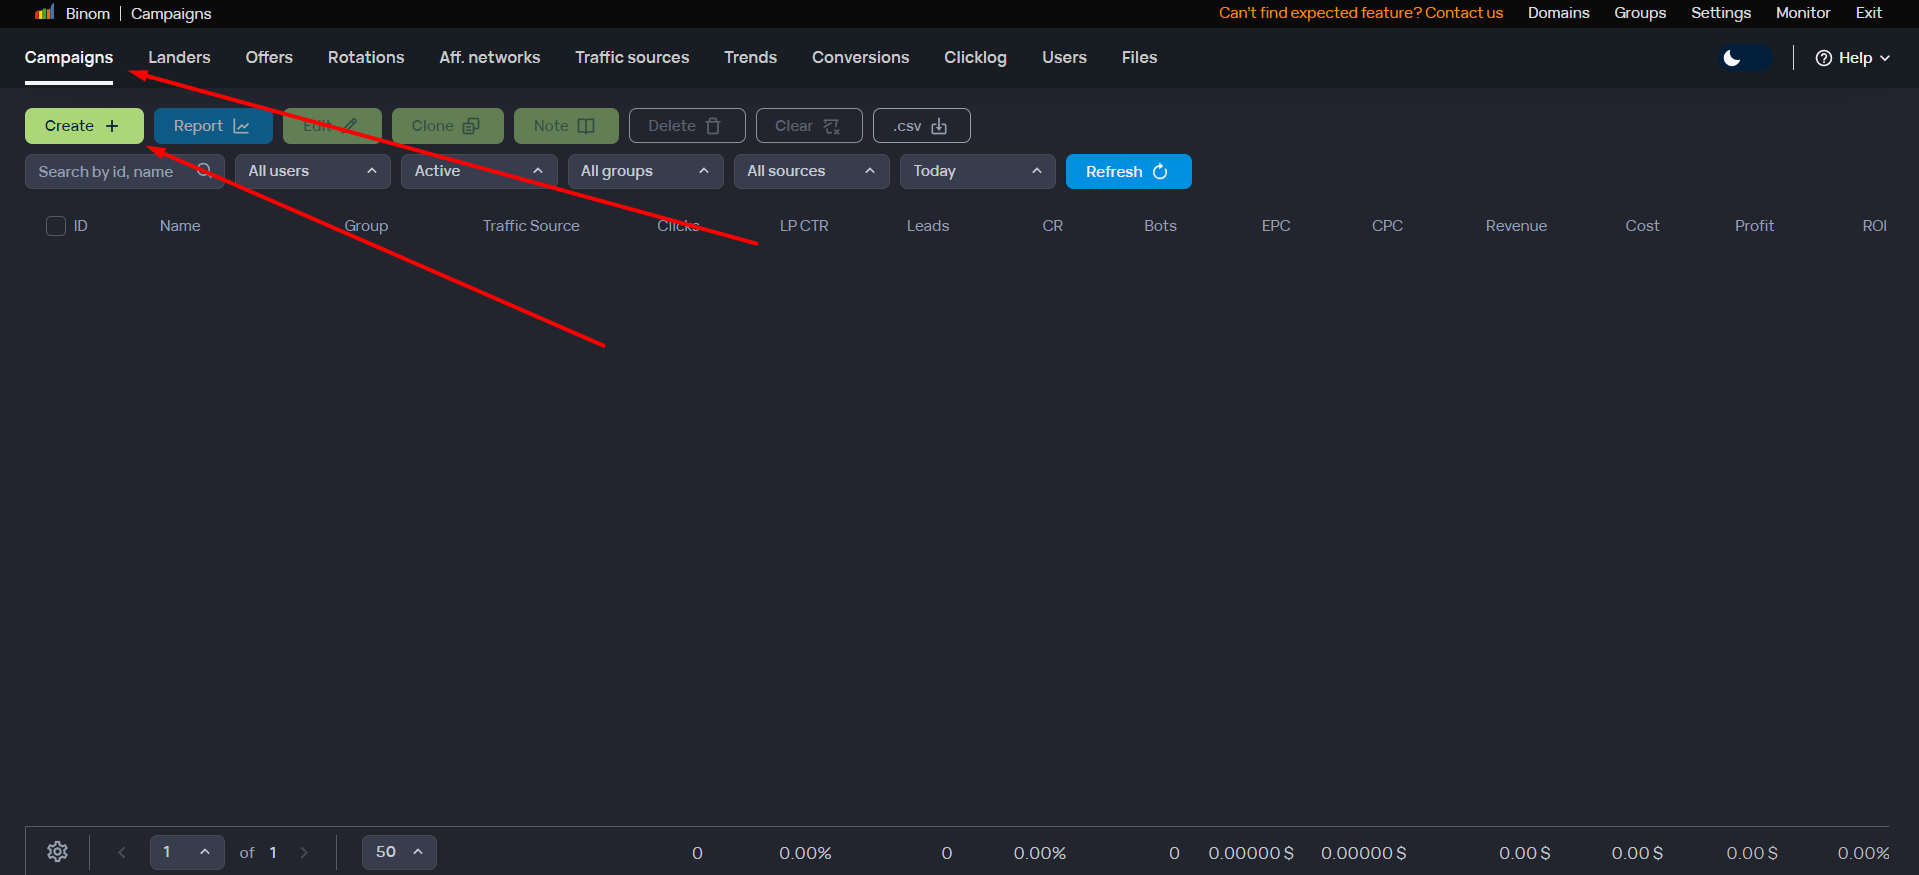
Step 4. Next, for the test, you need to create a campaign. Go to the Campaigns and click Create:
Step 5. In the window that appears, you need to:
- Specify the name of the campaign.
- Select the traffic source created earlier.
- Set Cost type to «Auto».
- Add Landing page: Direct.
- Add Offers: Direct URL — paste the Promo URL of the campaign here, specifying {clickid} in it.
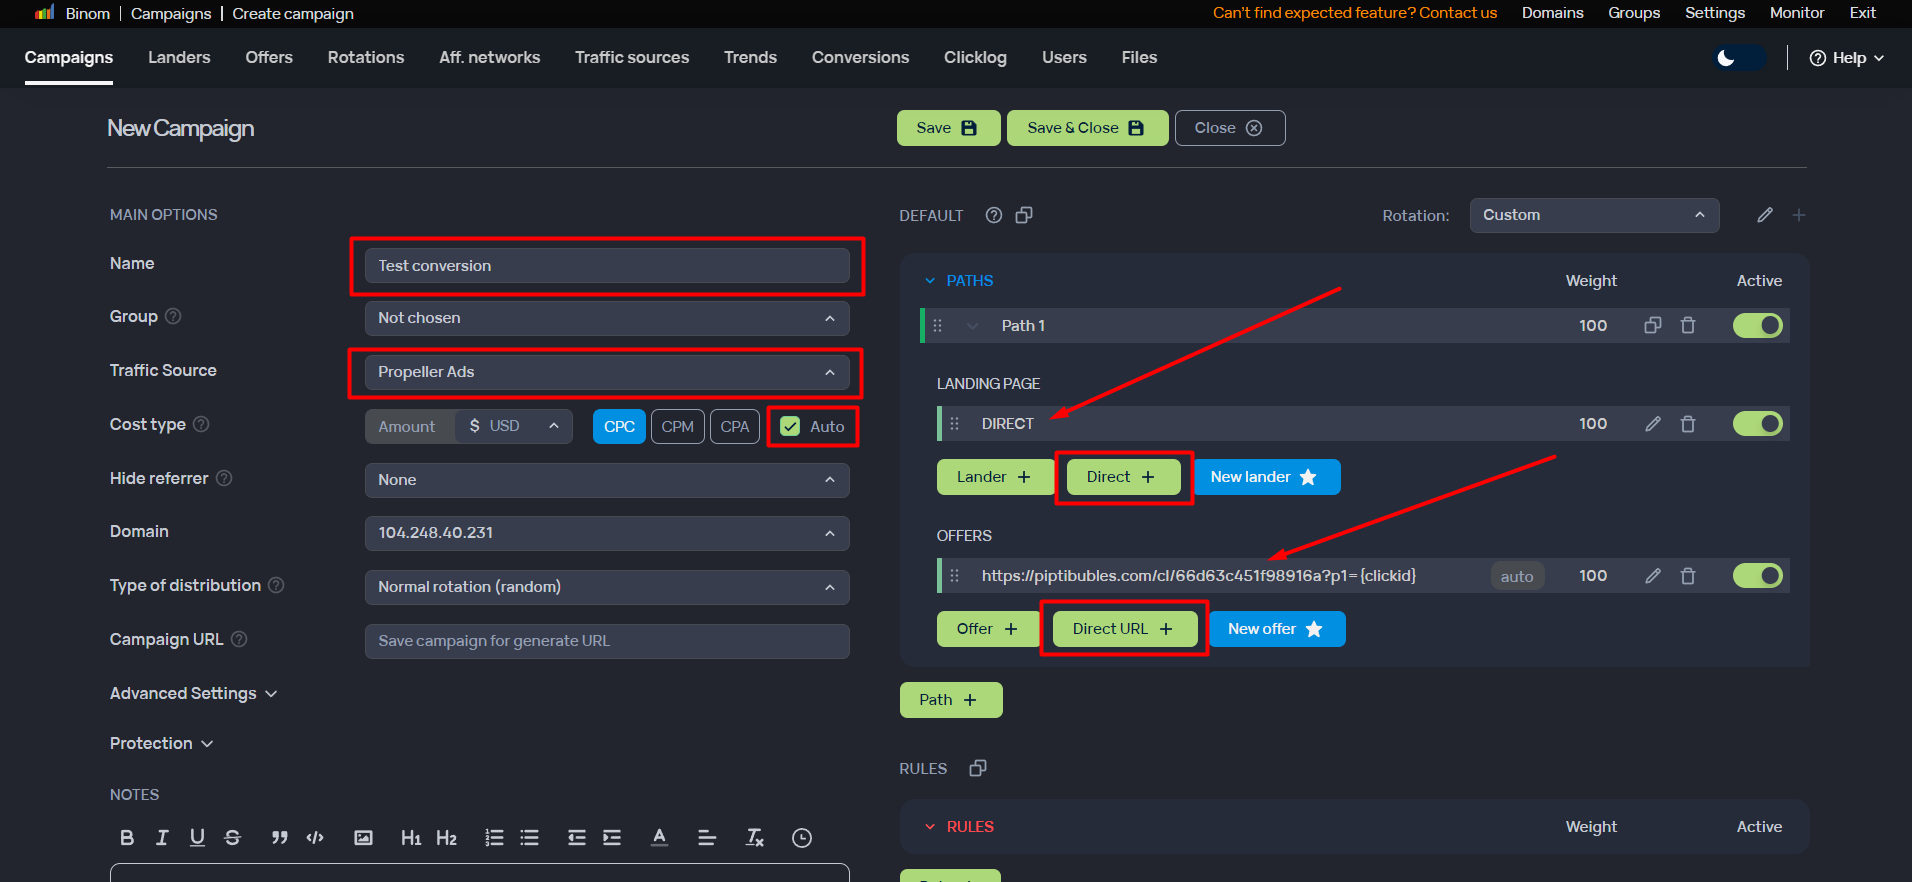
- Save the campaign.
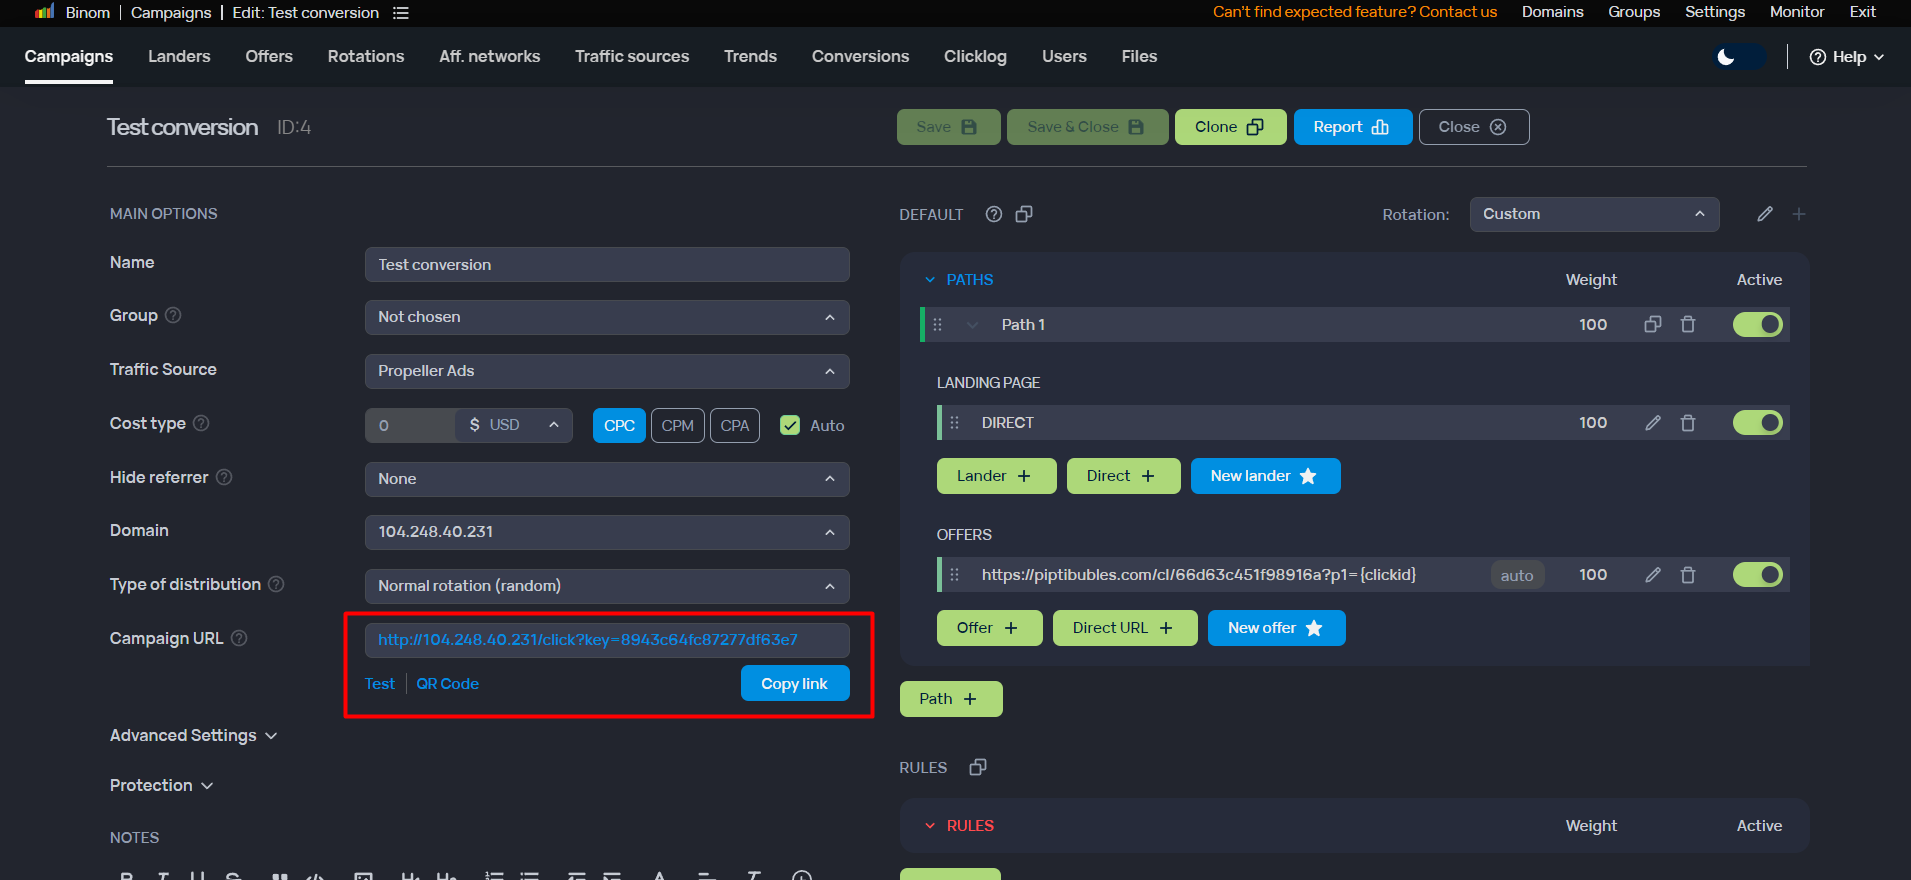
Step 6. After saving, you get the Campaign URL, which will be useful later:
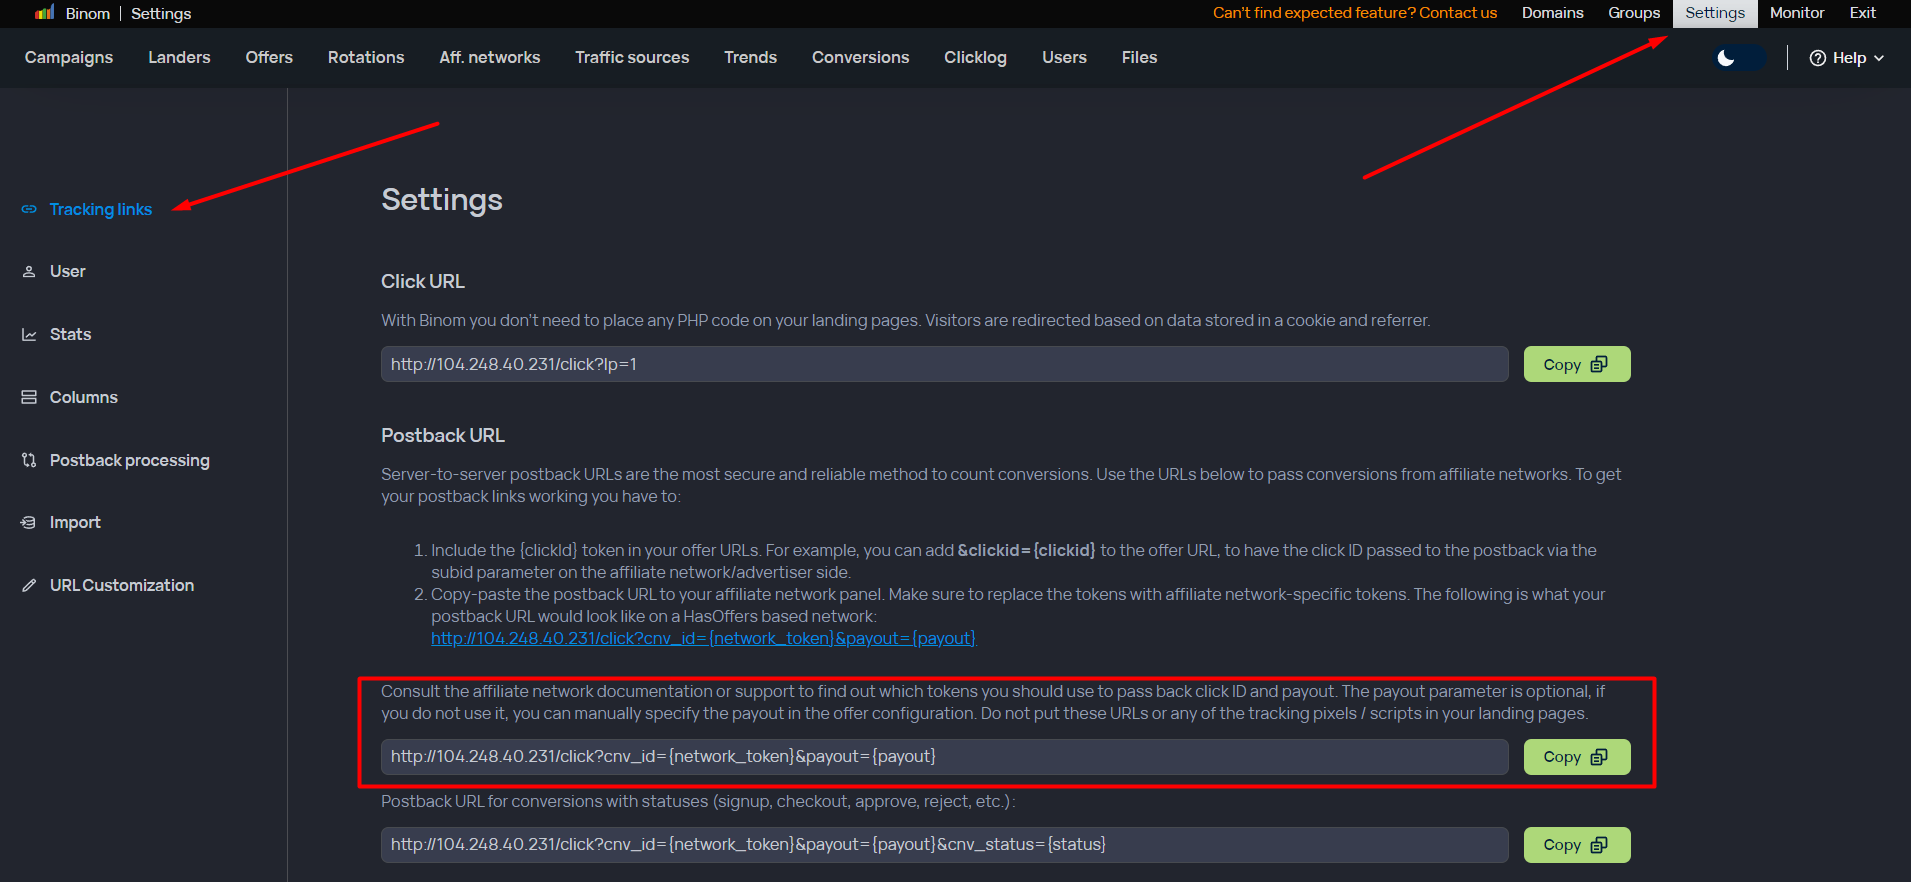
Step 7. You also need to find out your Postback URL. To do this, go to the Settings tab, Tracking links section and find the Postback URL field. Save it somewhere:
Step 8. Paste the Postback URL, which you previously took from Tracking links at Binom, into the corresponding field on the Step 3 of the campaign at Golden Goose, and you also need to add parameters to this link:
- {p1} is a mandatory parameter responsible for passng the clickid.
- {profit} is a mandatory parameter responsible for passing the bid.
- The resulting link should look something like this:

An example of the resulting link:
http://domain.com/click?cnv_id={p1}&payout={profit}
- Attention:
- The domain in the link will be the one you have registered for the Binom tracker.
- Along with the {p1} and {profit} parameters, you can pass other optional parameters. Check the Binom’s instructions to learn how to track other campaign parameters, also see our instructions for setting up the parameters:
Step 9. After inserting the Postback URL, click the Test conversion button and the Test conversion field will open. In this field, insert the URL of the Binom campaign:

Step 10. Once you have inserted the Postback URL, set the parameters {p1} and {profit} and inserted the campaign URL, click on Send test conversion. If everything is fine, you will receive a positive notification. If something went wrong, you will get a negative notification. Double-check the links you inserted again. Possible causes:
- The Promo URL you inserted into the tracker is not the same as the one in the Golden Goose campaign.
- You put the {p1} and {profit} parameters at the wrong places in the Postback URL link.
- You made a mistake when copying the campaign URL from the tracker to the Golden Goose campaign.
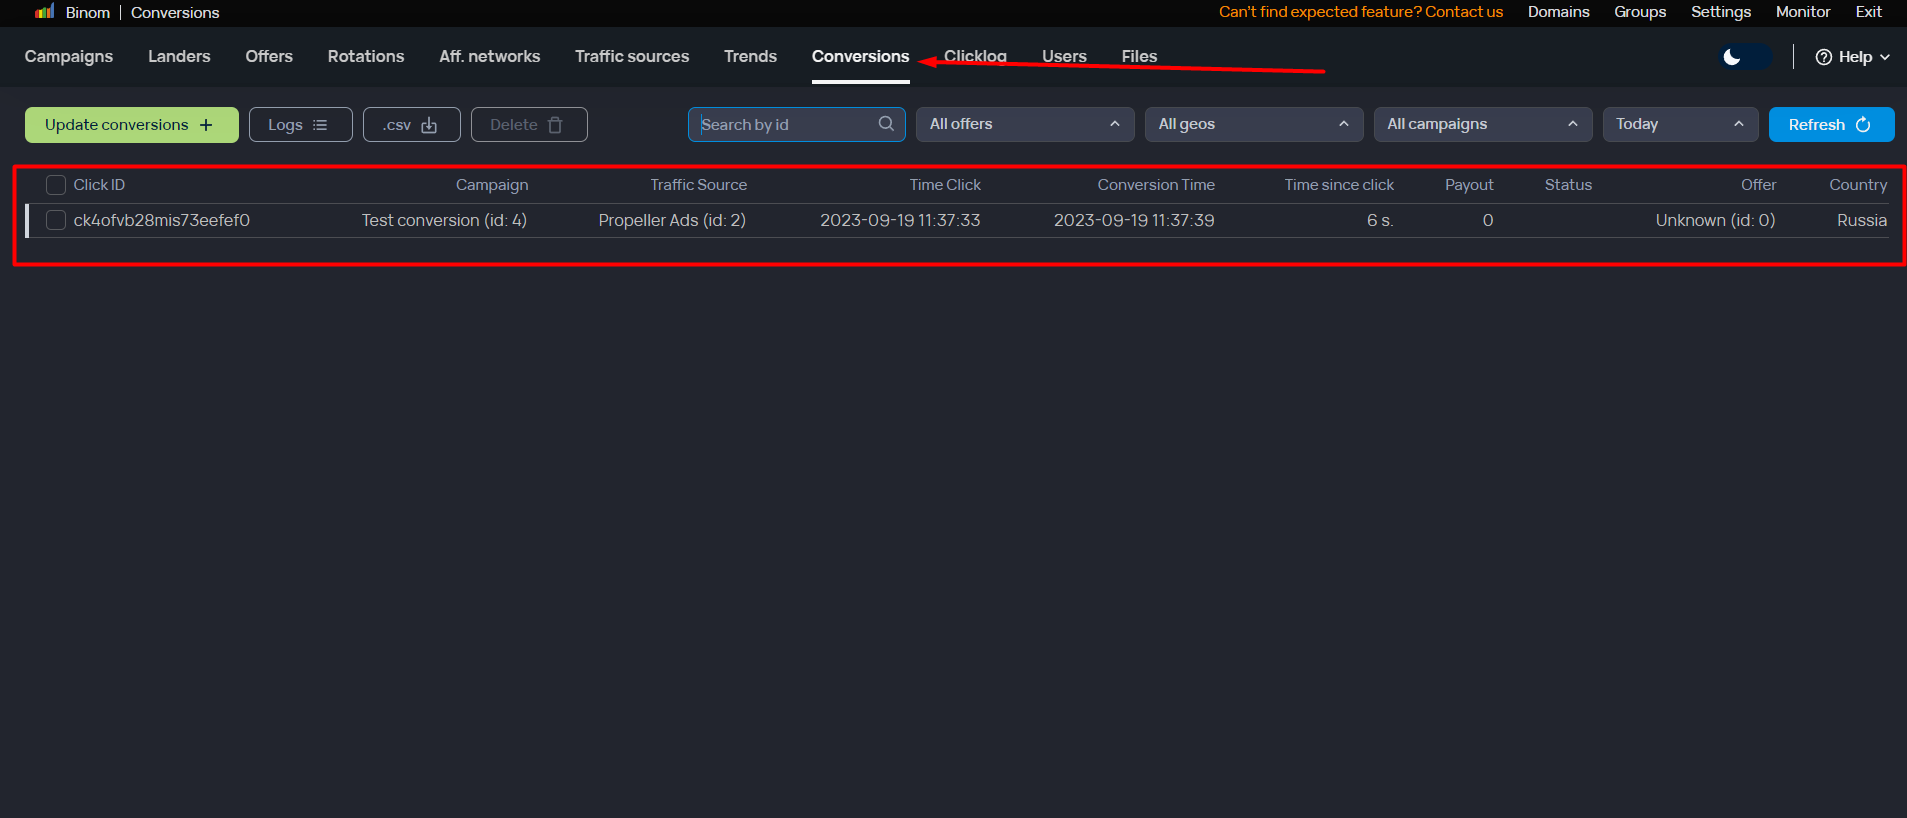
Step 11. After a successful submission, you need to wait a while for the conversion to reach your tracker. This usually takes up to 10 minutes. If everything is set up correctly, you will see the conversion in your tracker’s Conversion section.
If the conversion did not reach the tracker, it means that something was missed during the setup. We recommend repeating the whole setup process again.
Please note: In this section, we’ve only covered sending a test conversion to verify that the tracker and campaign are set up correctly at Golden Goose.
For more in-depth traffic analysis and broader statistics transmission, you need to have an understanding of the tracker’s instructions and perform a more detailed configuration.

To test out the conversion sending to the Bemob tracker, you must first create a campaign at Golden Goose:
Step 1. In the Golden Goose Dashboard, create a campaign for the slected offer:
Step 2. After creating a campaign, go to Step 3 in its settings:
Here you need to copy the Promo URL of the campaign, which you will need later:
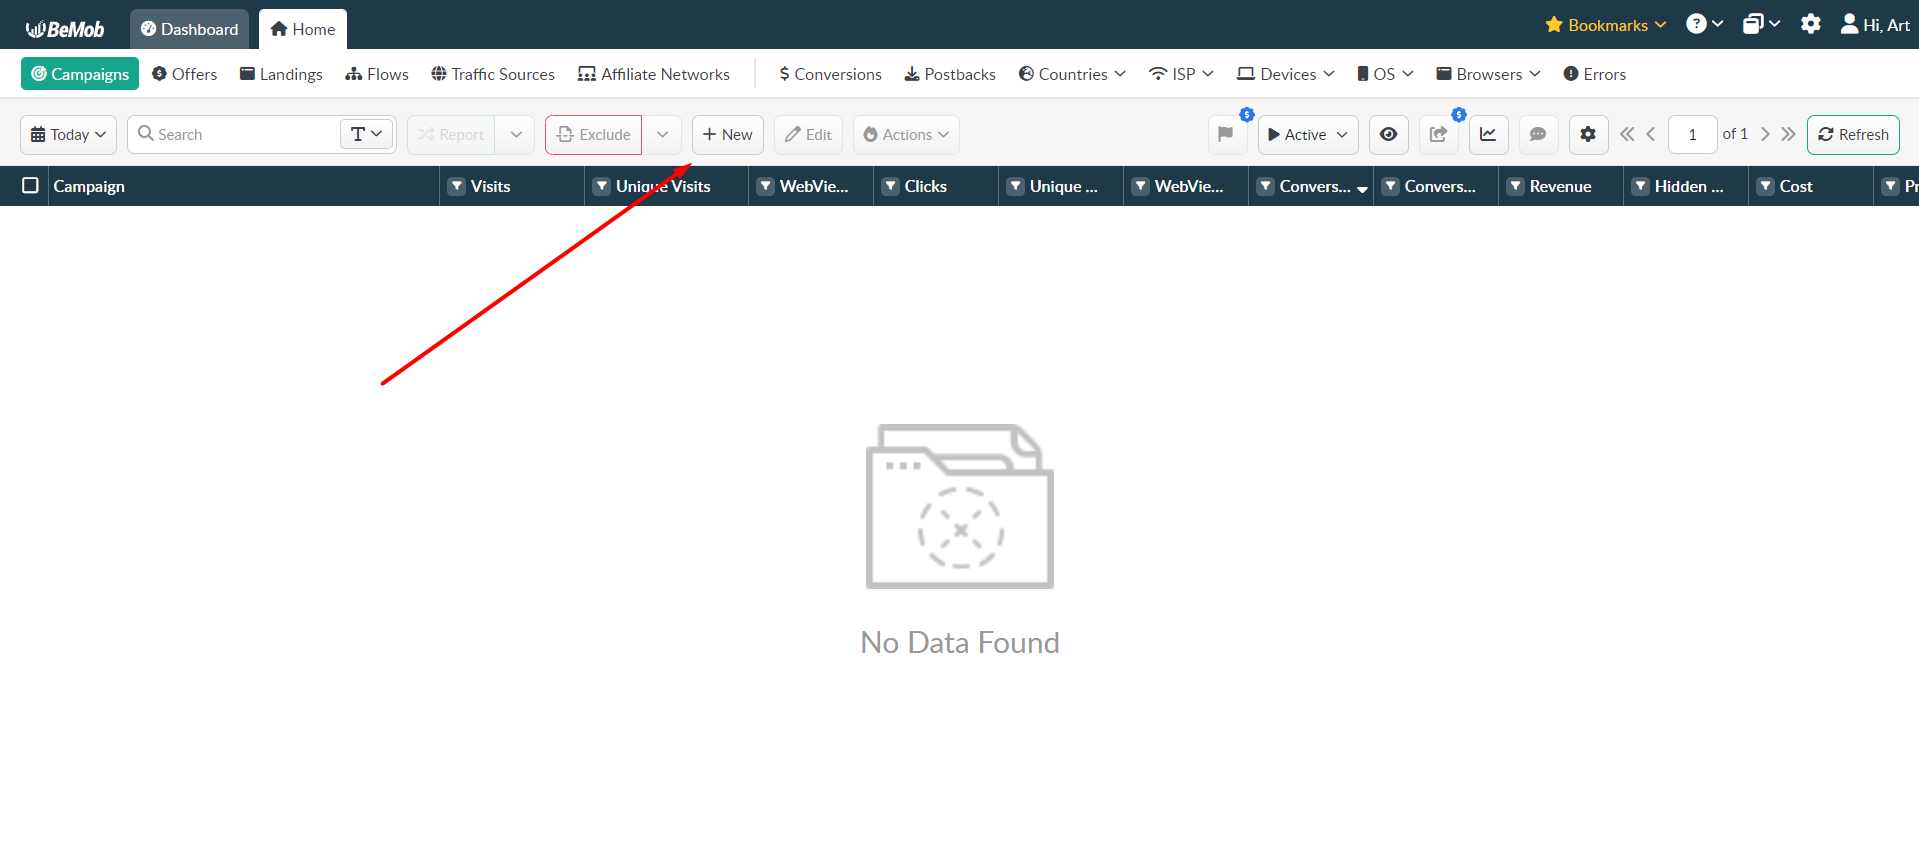
Step 3. Next, you need to go to Bemob, and create a campaign. Click New:
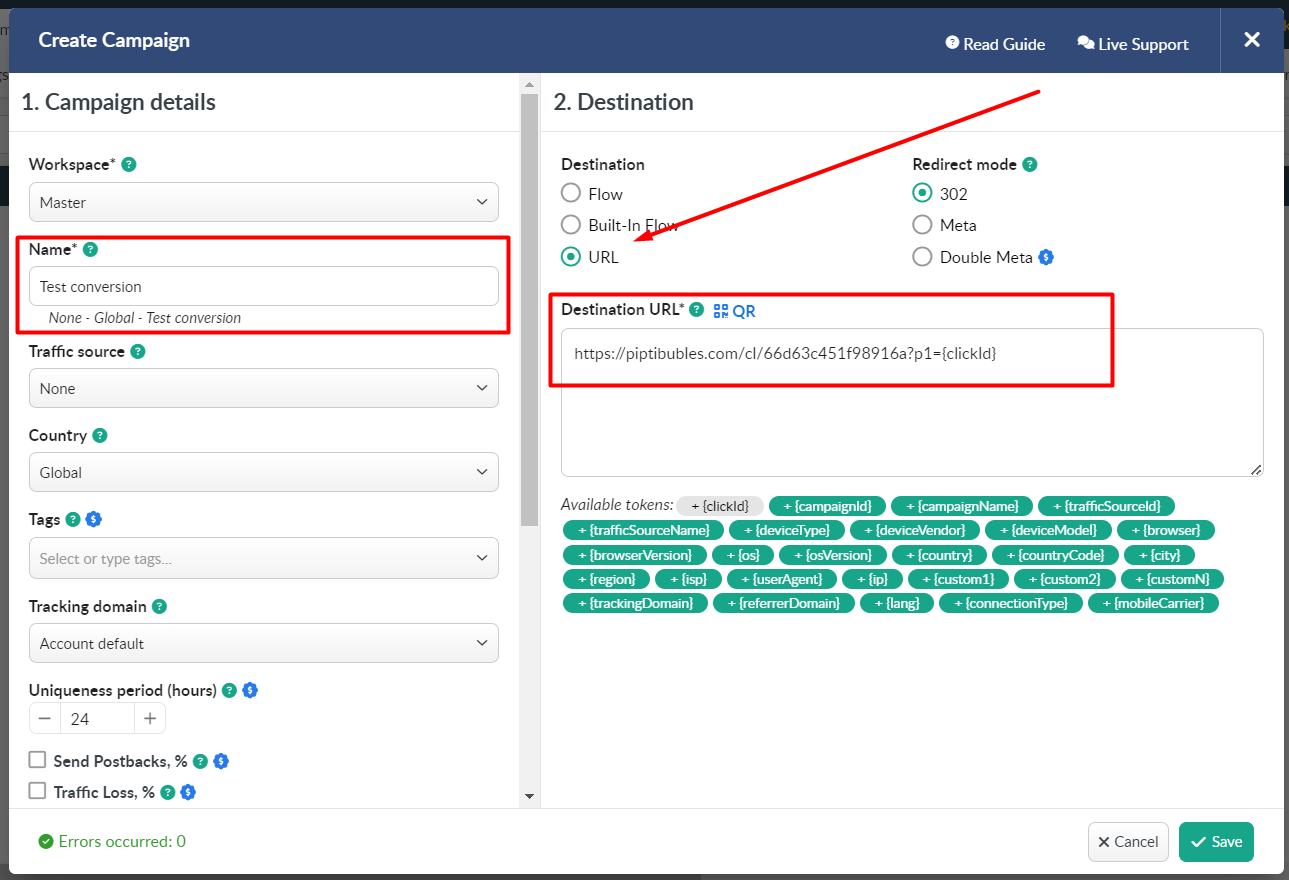
Step 4. In the window that appears, specify:
- Campaign name.
- Set destination to URL.
- In the URL field, paste the Promo URL from your Golden Goose campaign.
- It is obligatory to add {clickid} to the Promo URL.
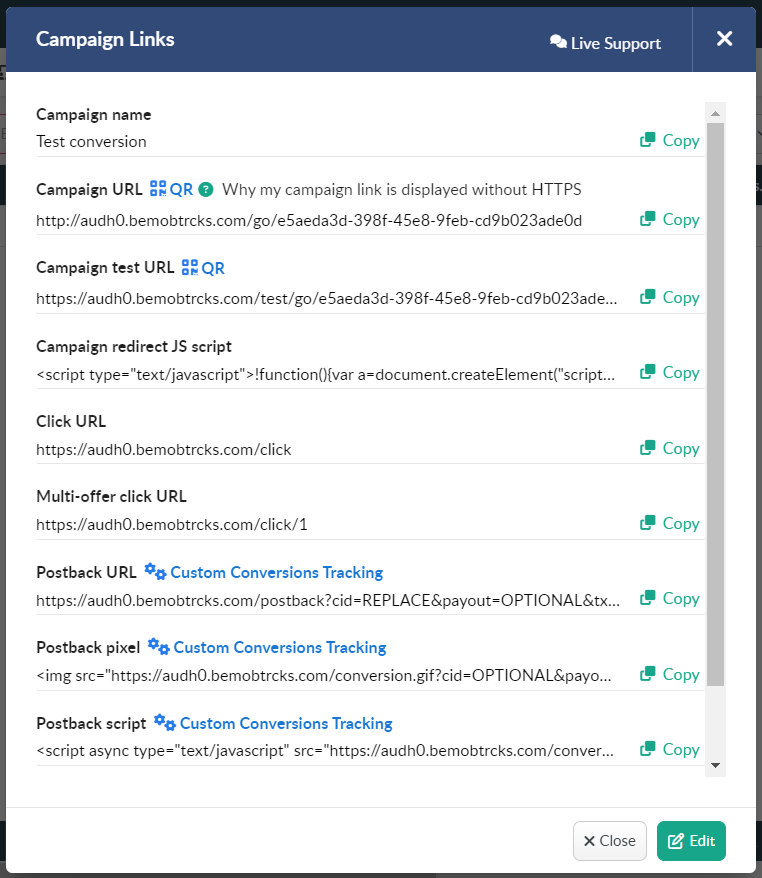
Step 5. After saving the campaign, you get the links of this campaign. In this window you need to get:
- Campaign URL.
- Postback URL.
Step 6. Paste the postback URL, which you previously took from the created campaign in Bemob, into the corresponding field in the Step 3 of the campaign at Golden Goose, and you also need to add parameters to this link:
- {p1} is a mandatory parameter responsible for passng the clickid.
- {profit} is a mandatory parameter responsible for passing the bid.
- The resulting link should look something like this:

The resulting link example:
https:/domain.com/postback?cid={p1}&payout={profit}
- Attention:
- The domain in the link will be the one you have registered for the Bemob tracker.
- Along with the {p1} and {profit} parameters, you can pass other optional parameters. Check the Bemob’s instructions to learn how to track other campaign parameters, also see our instructions for setting up the parameters:
Step 7. After inserting the Postback URL, click the Test conversion button and the Test conversion field will open. In this field, insert the URL of the Bemob campaign:

Step 8. Once you have inserted the Postback URL, set the parameters {p1} and {profit} and inserted the campaign URL, click on Send test conversion. If everything is fine, you will receive a positive notification. If something went wrong, you will get a negative notification. Double-check the links you inserted again. Possible causes:
- The Promo URL you inserted into the tracker is not the same as the one in the Golden Goose campaign.
- You put the {p1} and {profit} parameters at the wrong places in the Postback URL link.
- You made a mistake when copying the campaign URL from the tracker to the Golden Goose campaign.
Step 9. After a successful submission, you need to wait a while for the conversion to reach your tracker. This usually takes up to 10 minutes. If everything is set up correctly, you will see the conversion in your tracker:
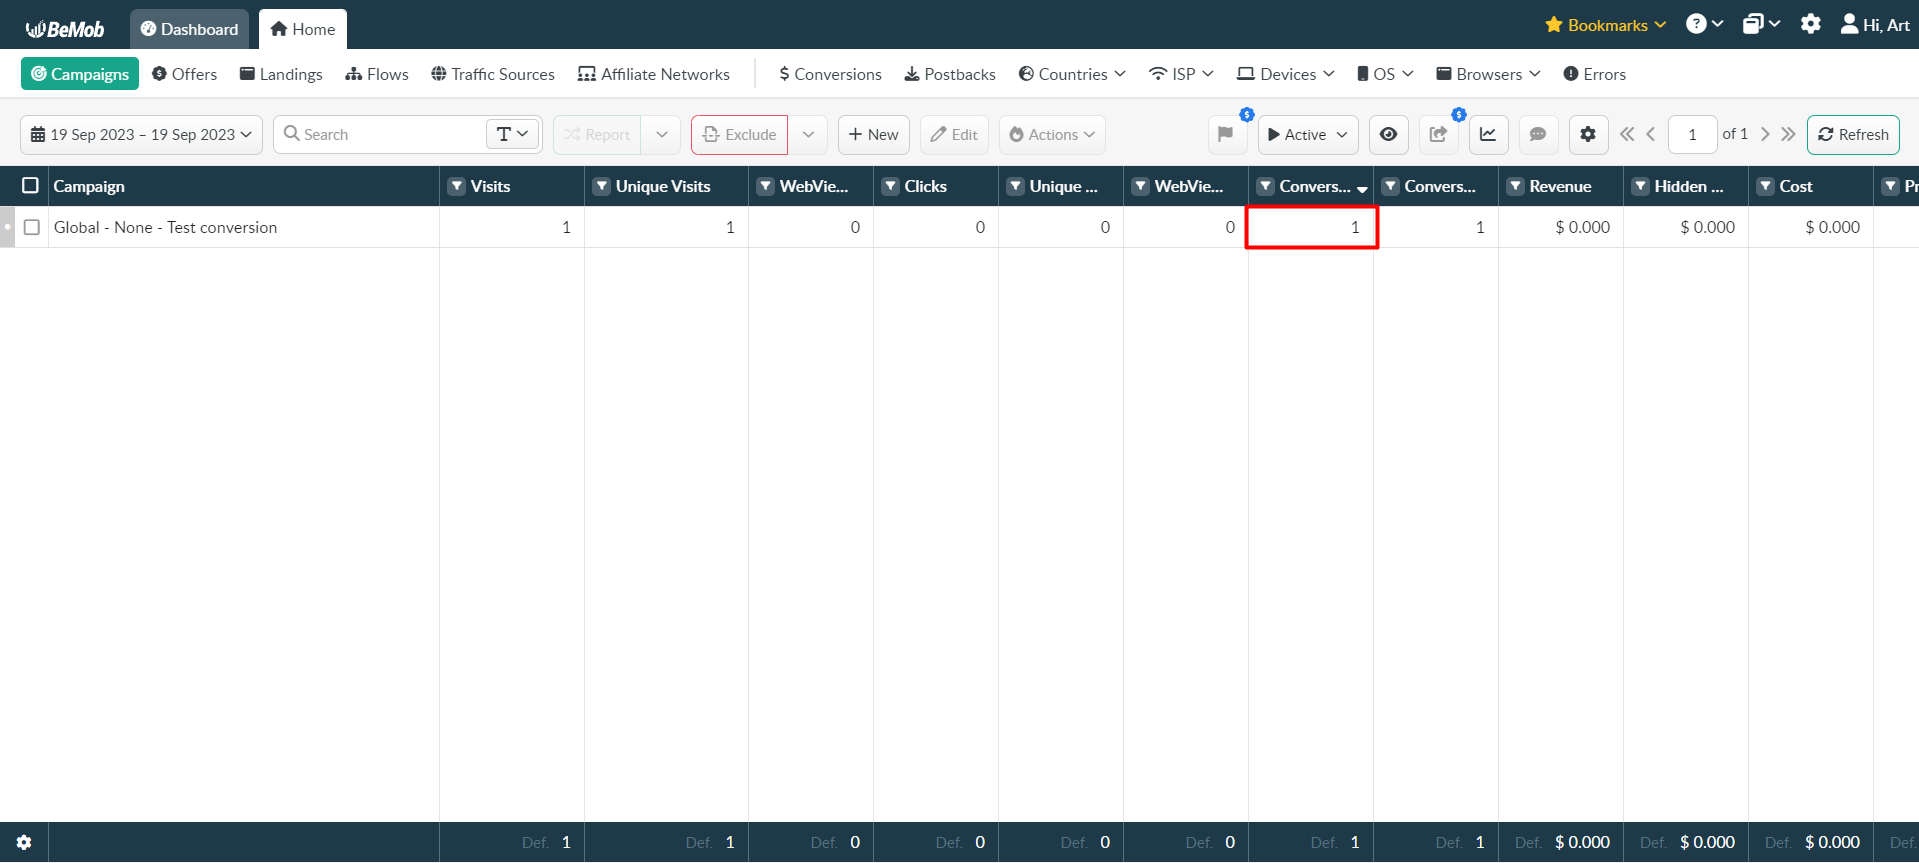
In the Conversions section you will also see your test conversion:
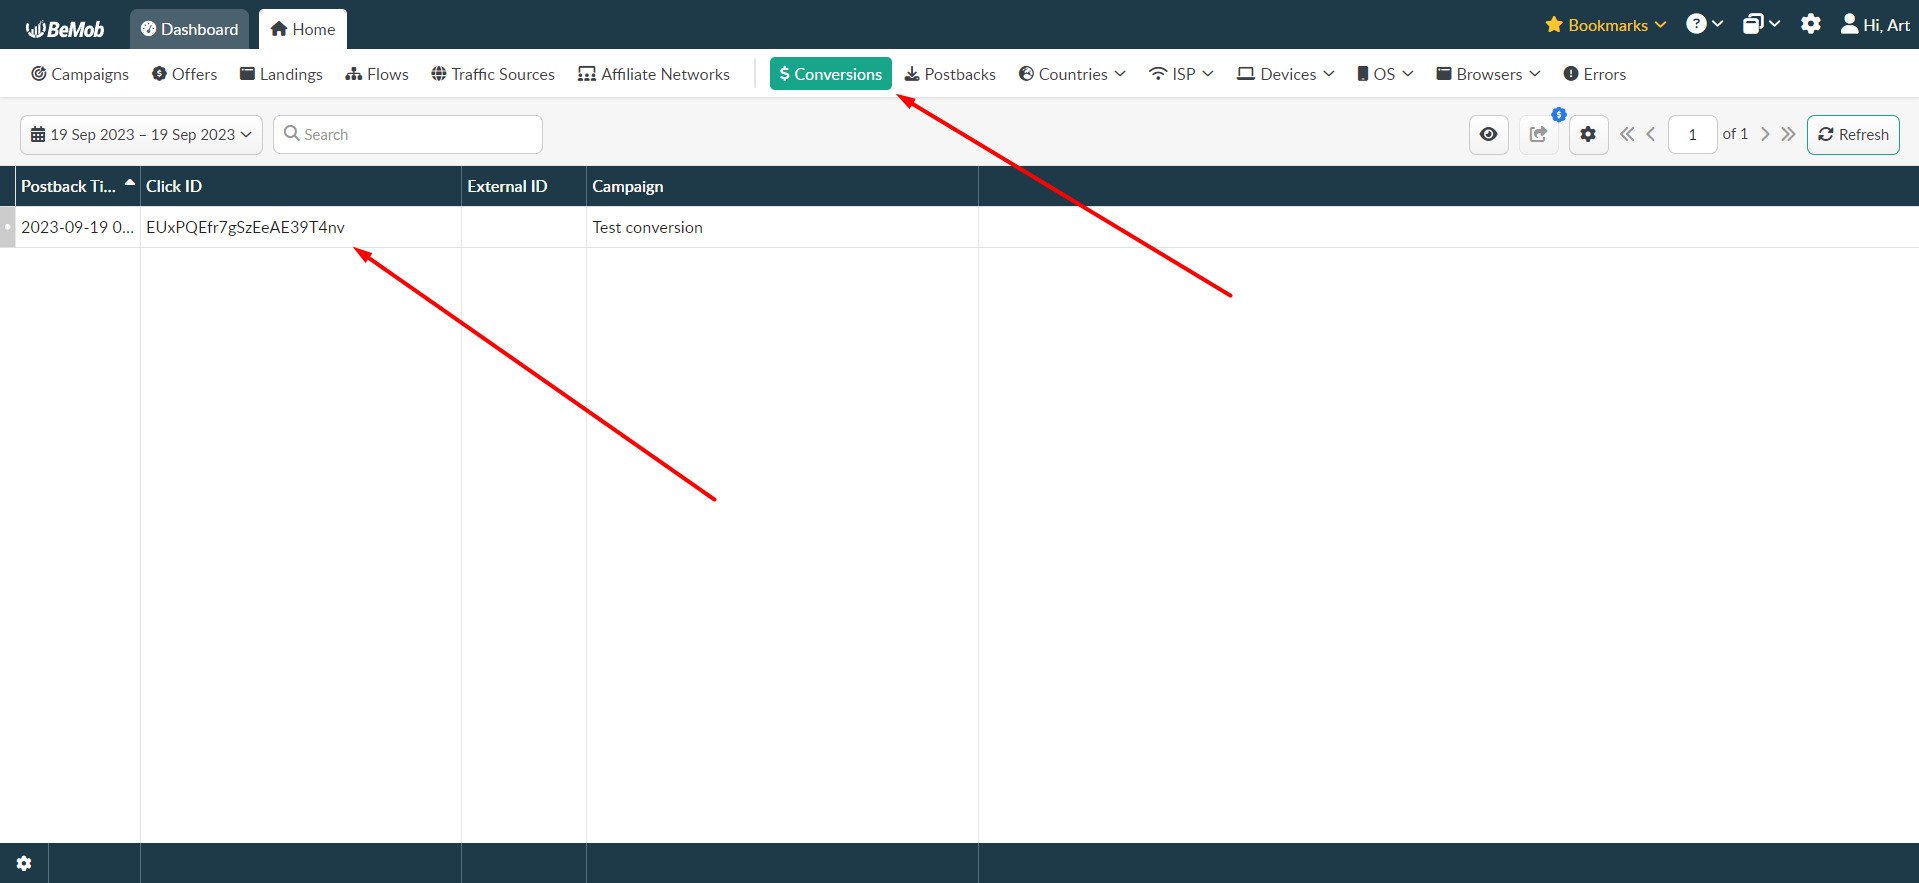
If the conversion did not reach the tracker, it means that something was missed during the setup. We recommend repeating the whole setup process again.
Please note: In this section, we’ve only covered sending a test conversion to verify that the tracker and campaign are set up correctly at Golden Goose.
For more in-depth traffic analysis and broader statistics transmission, you need to have an understanding of the tracker’s instructions and perform a more detailed configuration.

To test out the conversion sending to the RedTrack tracker, you must first create a campaign at Golden Goose:
Step 1. In the Golden Goose Dashboard, create a campaign for the slected offer:
Step 2. After creating a campaign, go to Step 3 in its settings:
Here you need to copy the Promo URL of the campaign, which you will need later:
Step 3. Next you need to go to RedTrack, and add a traffic source. Go to the Traffic channels section, click on the New from scratch button:
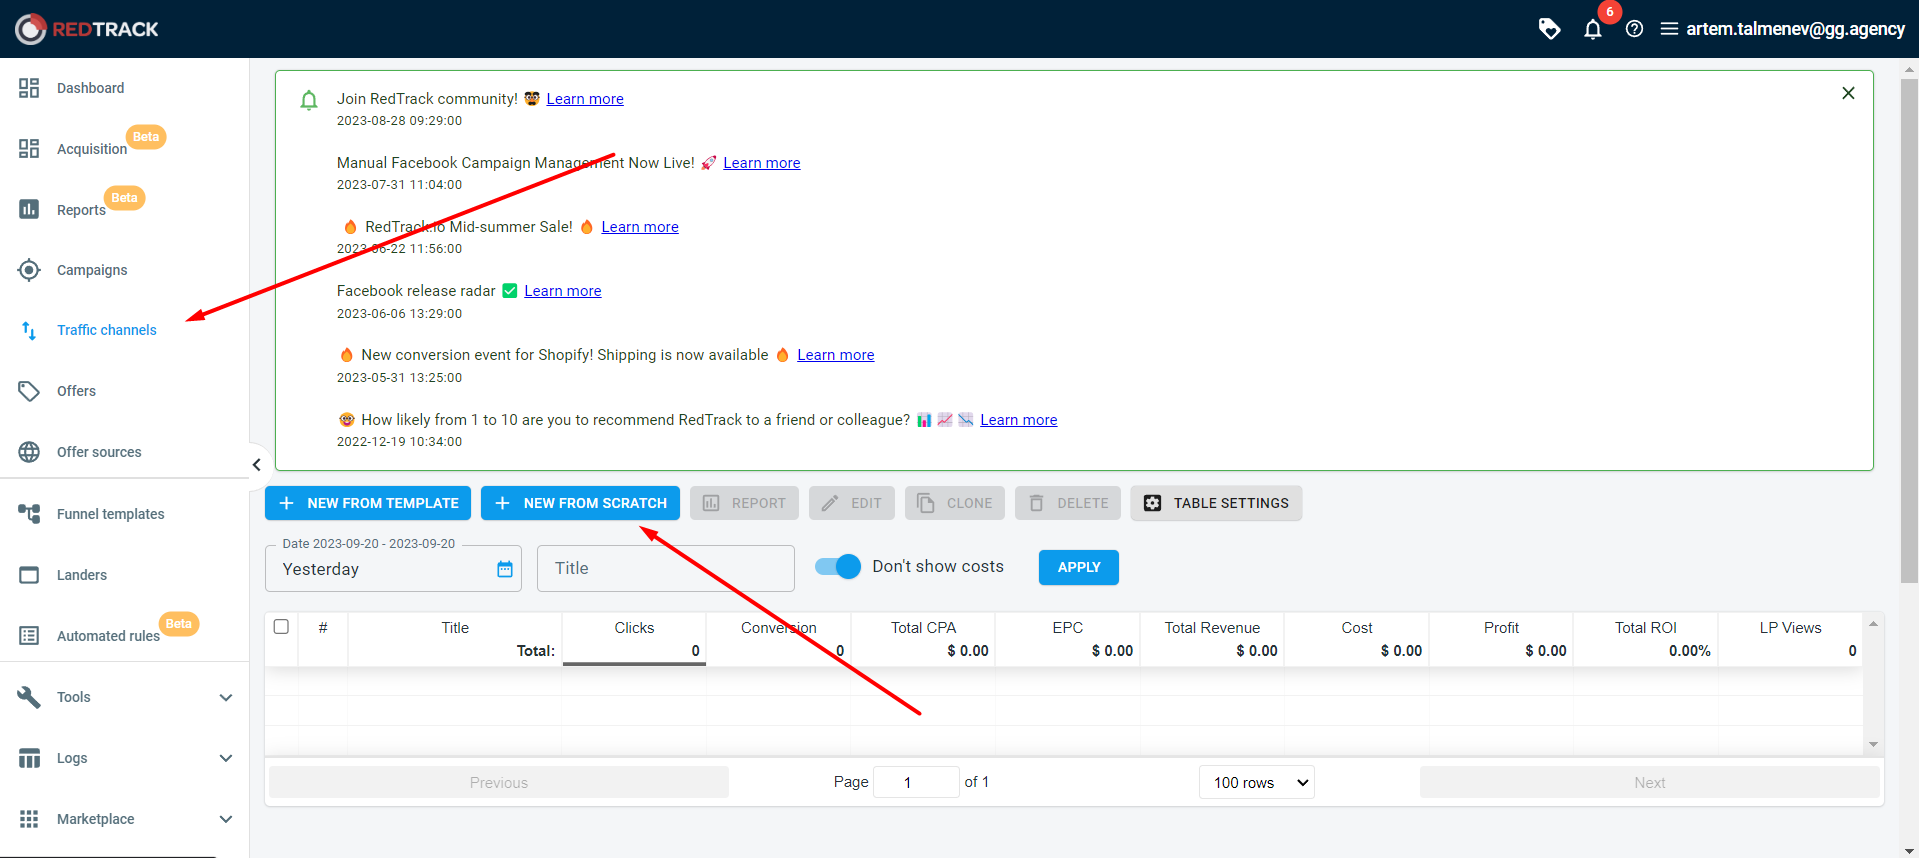
Step 4. Let’s use PropellerAds as an example. In the appearing window, specify:
- Traffic source name.
- insert the Postback URL of the traffic source:
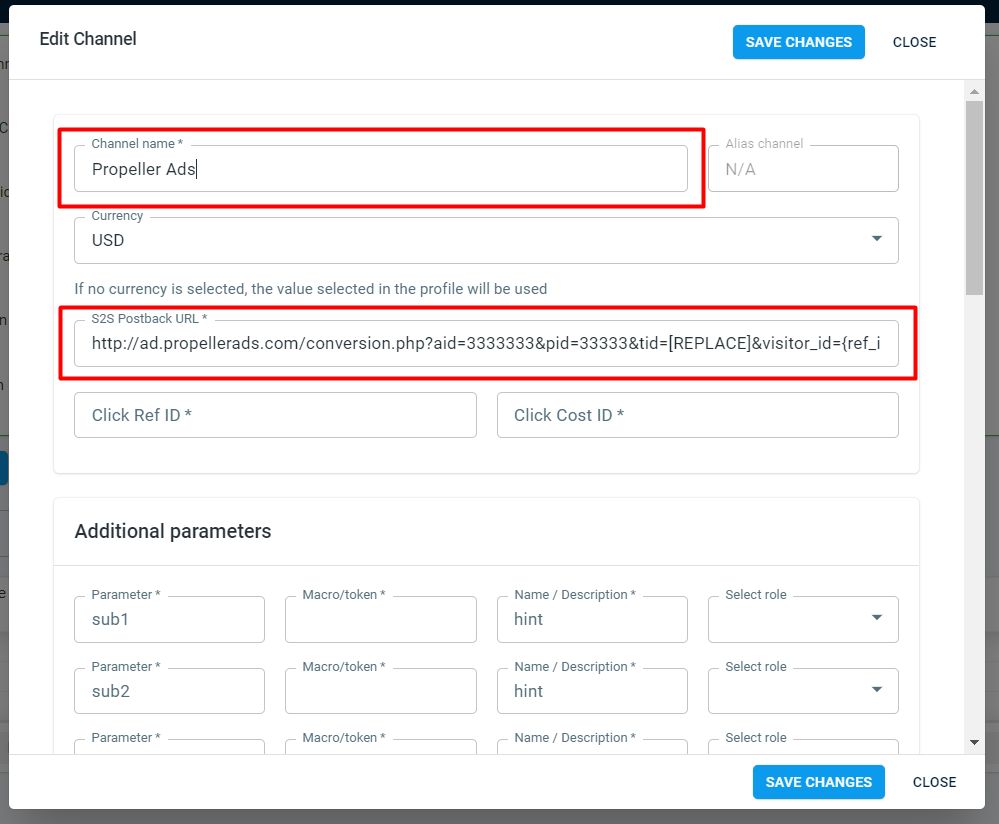
You can also select a traffic source from the pre-made integrations by clicking on New from template.
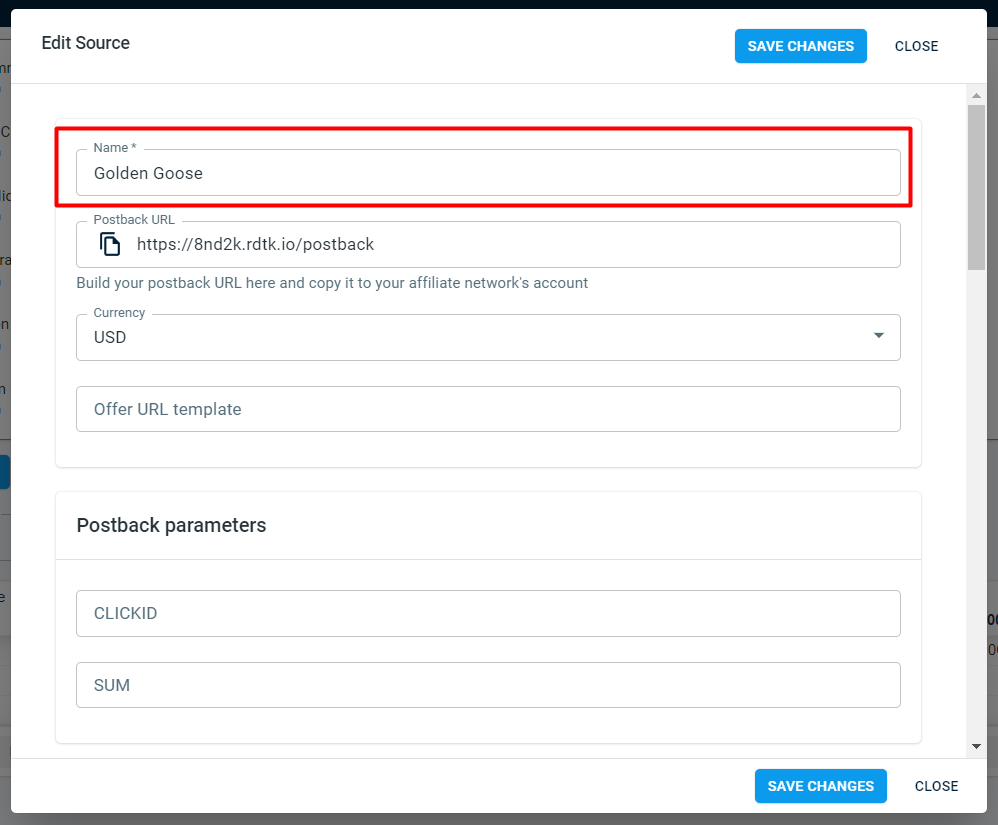
Step 5. Next, you need to add an offer source. Go to Offer sources, and add a new source:
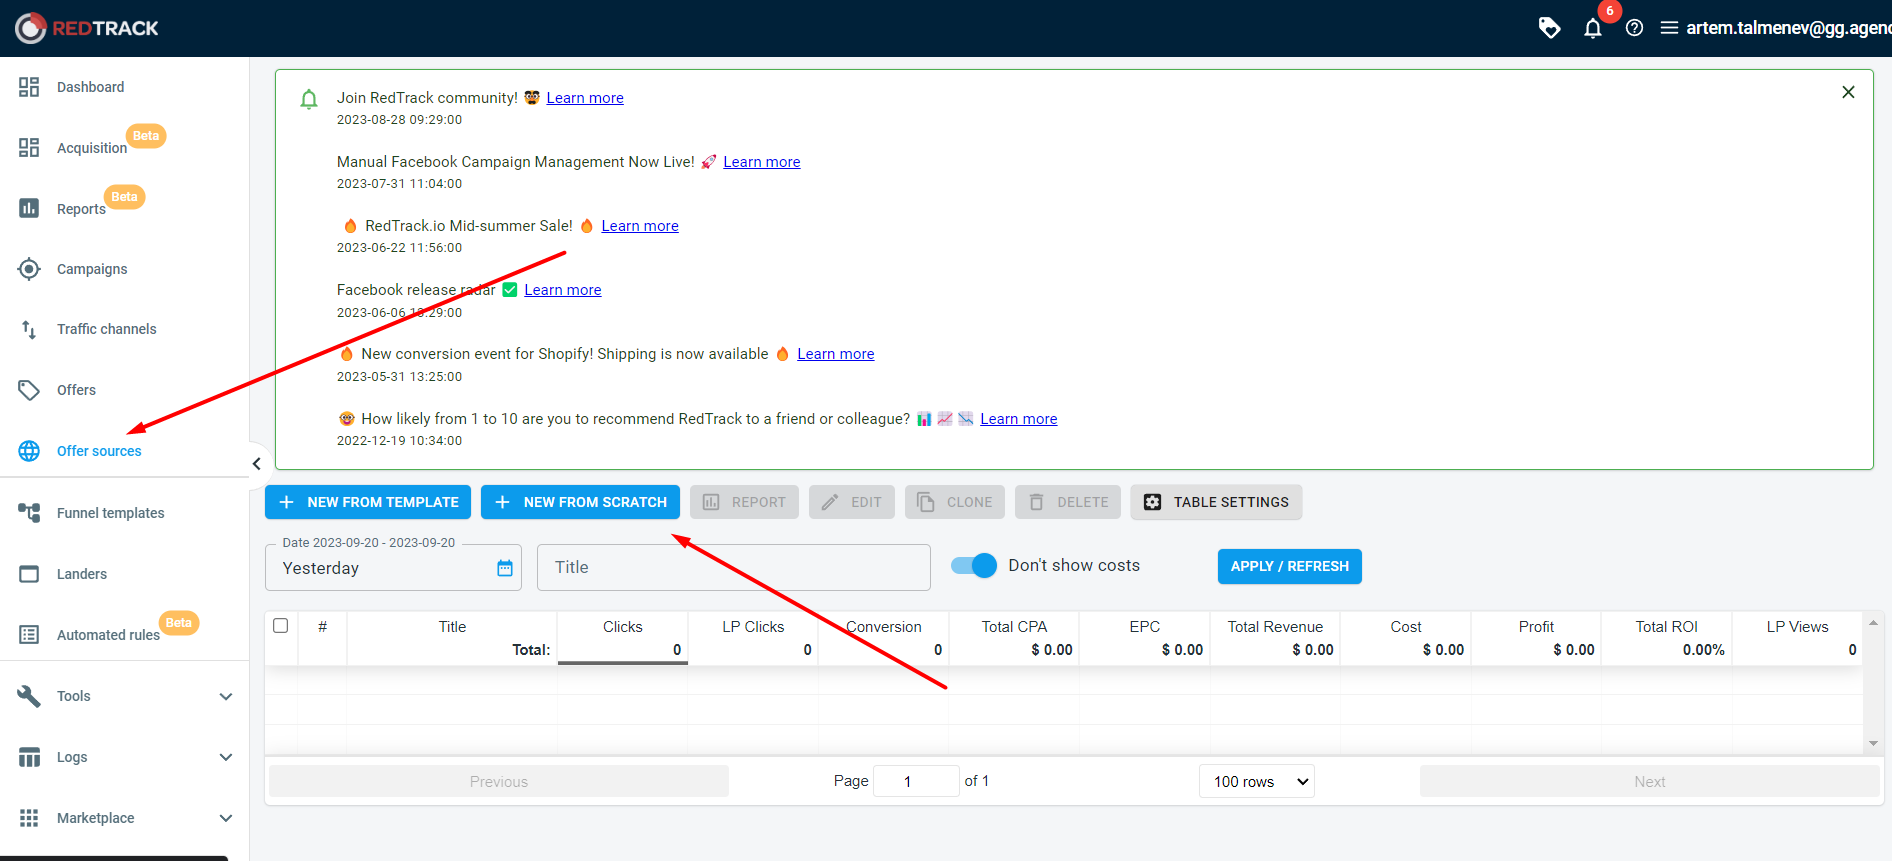
Step 6. Enter a name in the window that appears. For the test, let’s leave the other fields unchanged:
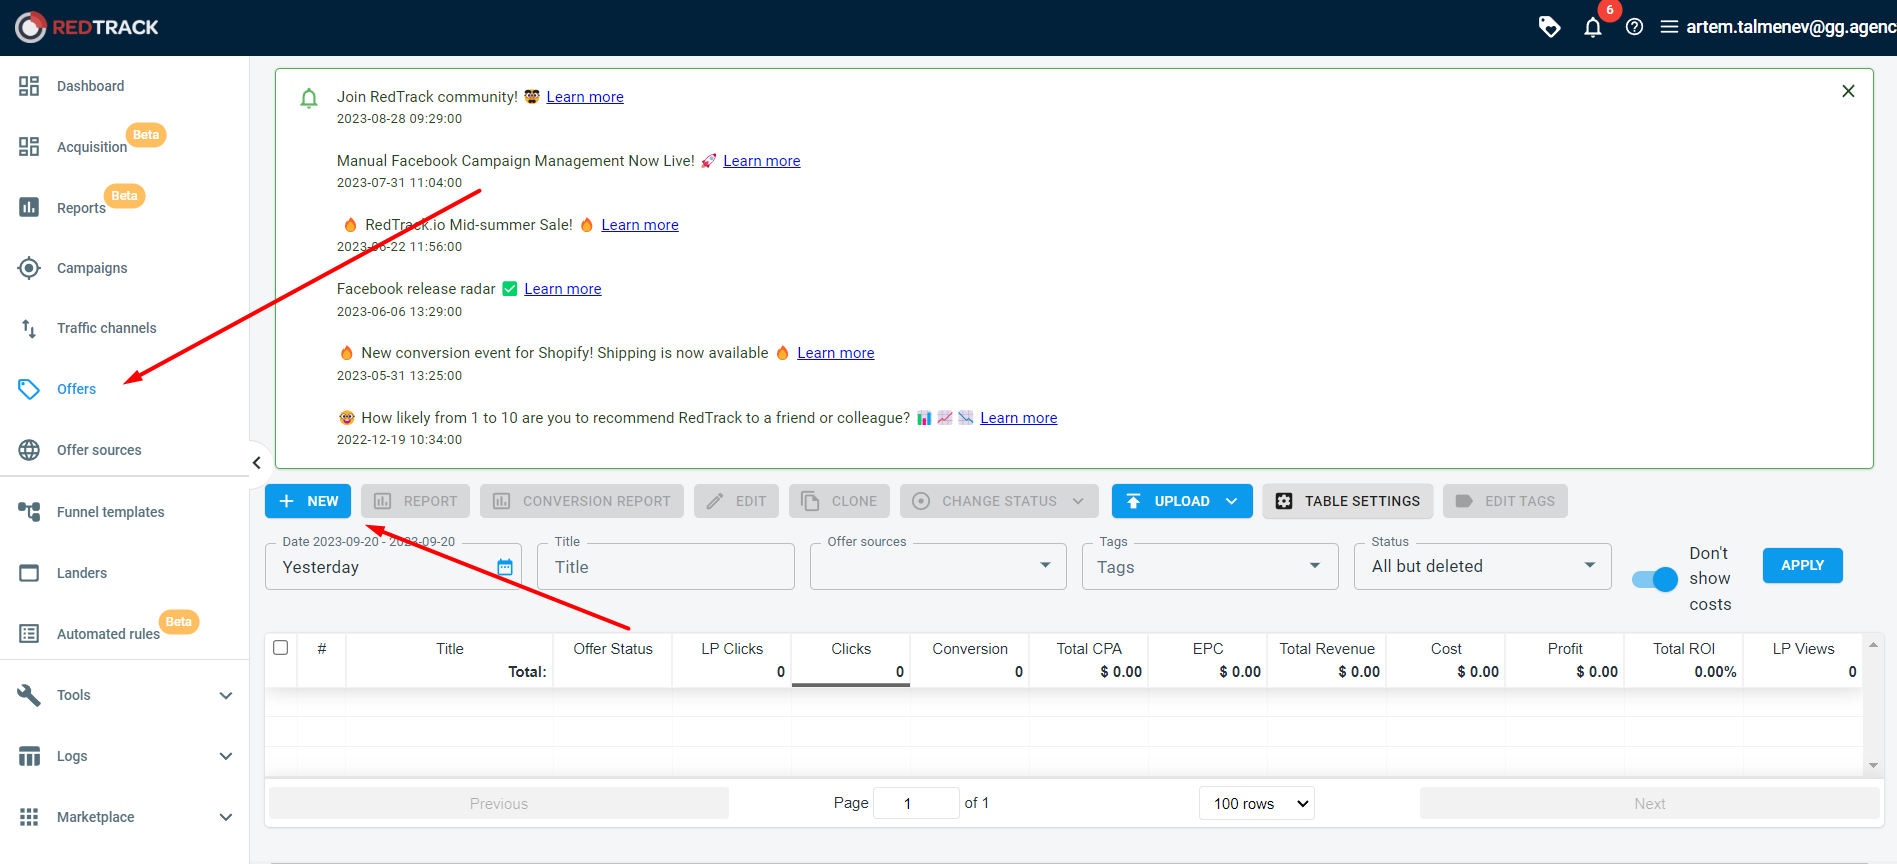
Step 7. Next, you need to add the offer that we are going to test. To do this, go to the Offers section and click New:
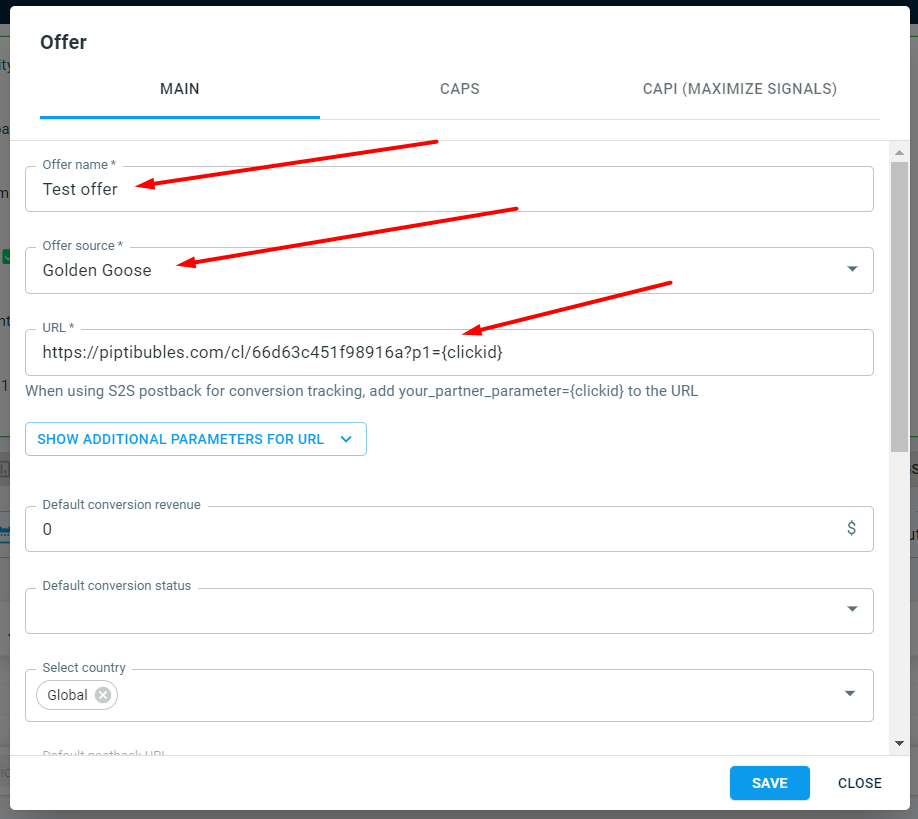
Step 8. In the appearing window, specify:
- Offer name.
- Offer source.
- The link to the offer, which is the Promo URL in a previously created campaign at Golden Goose.
For the test, leave the other settings unchanged:
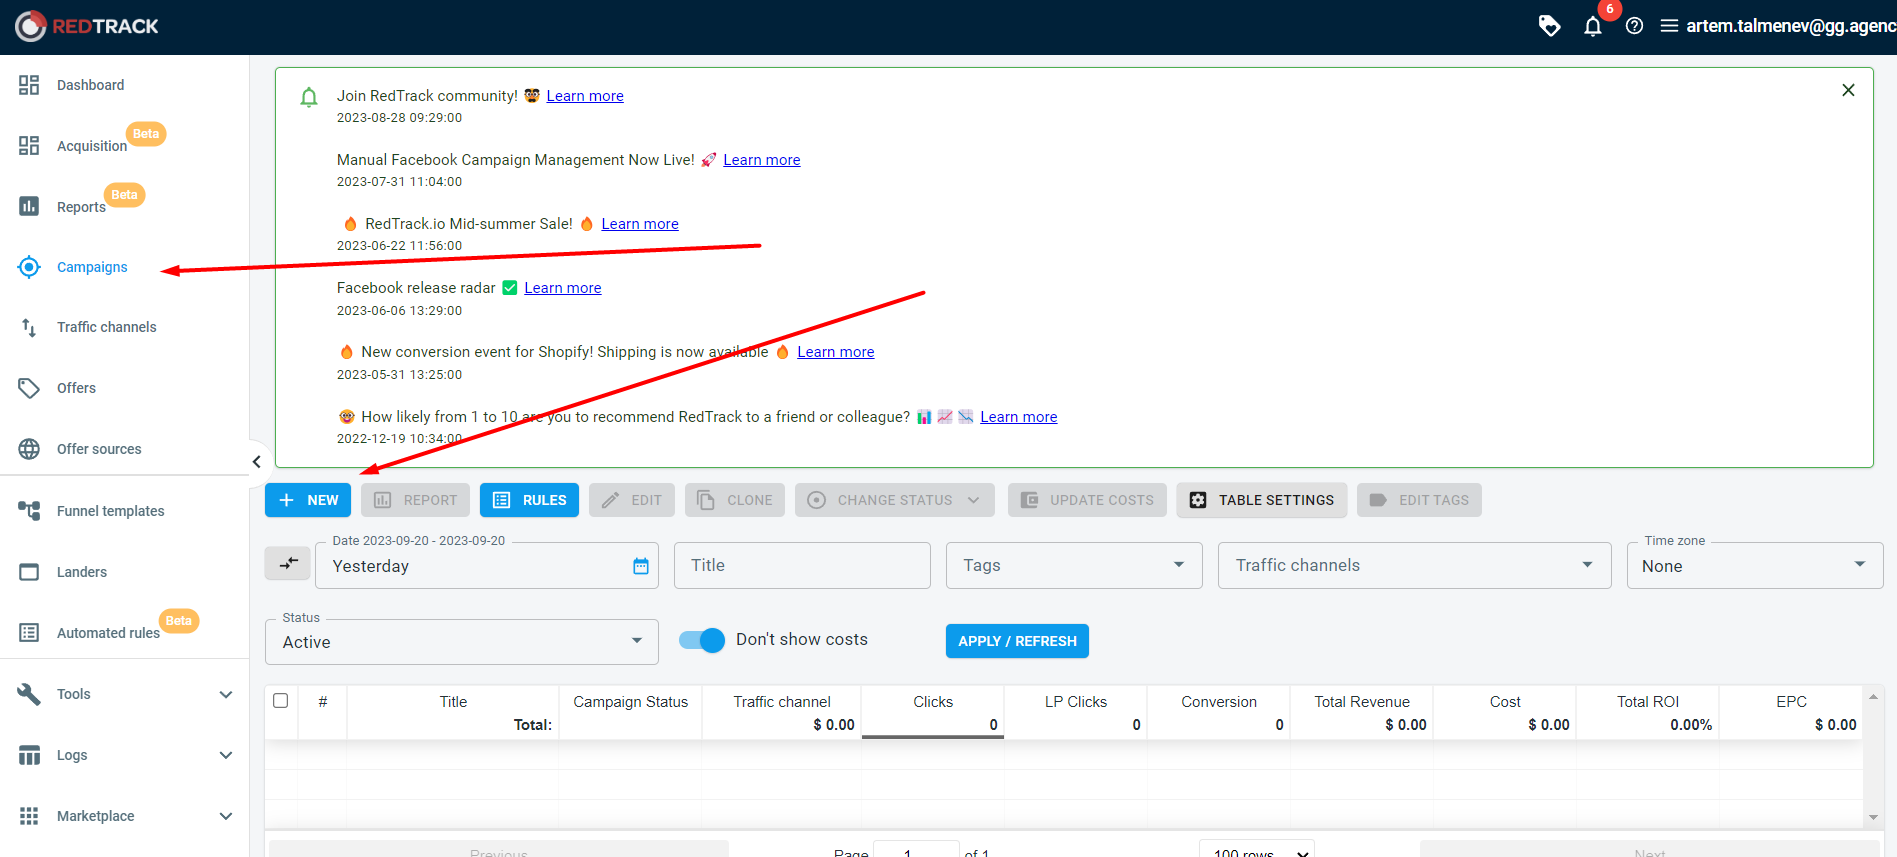
Step 9. Next, you need to create a campaign. Go to the Campaigns section and click New:
Step 10. In the appearing window, specify:
- Campaign name.
- Choose a traffic source.
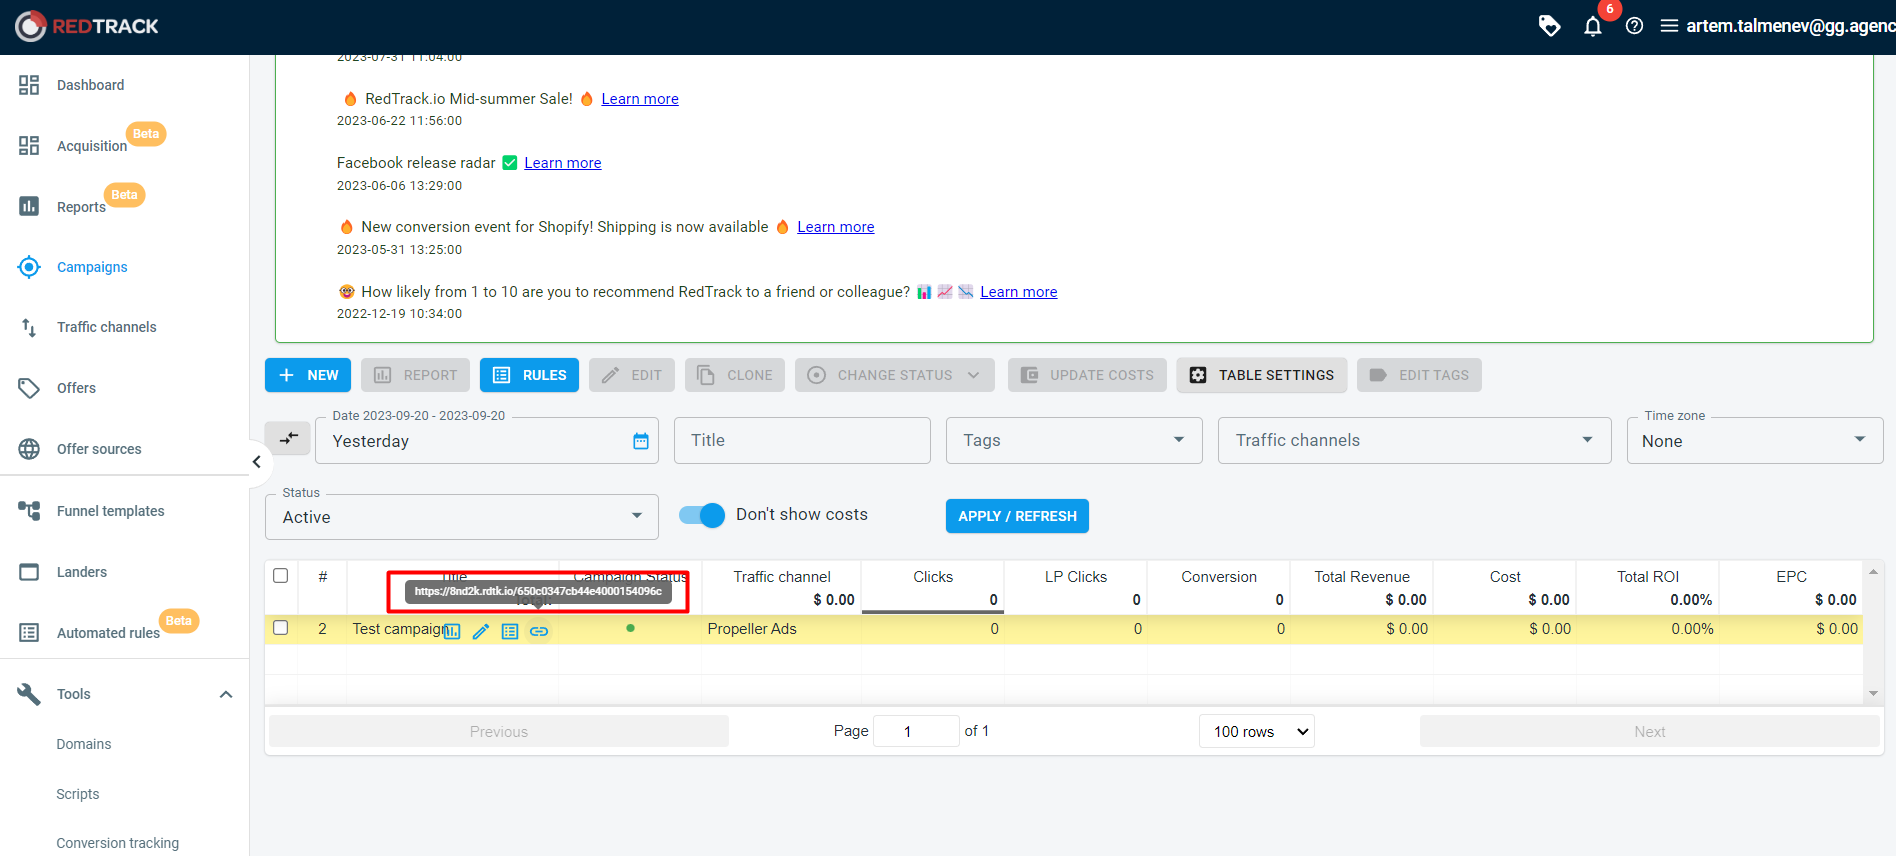
- Choose an offer.
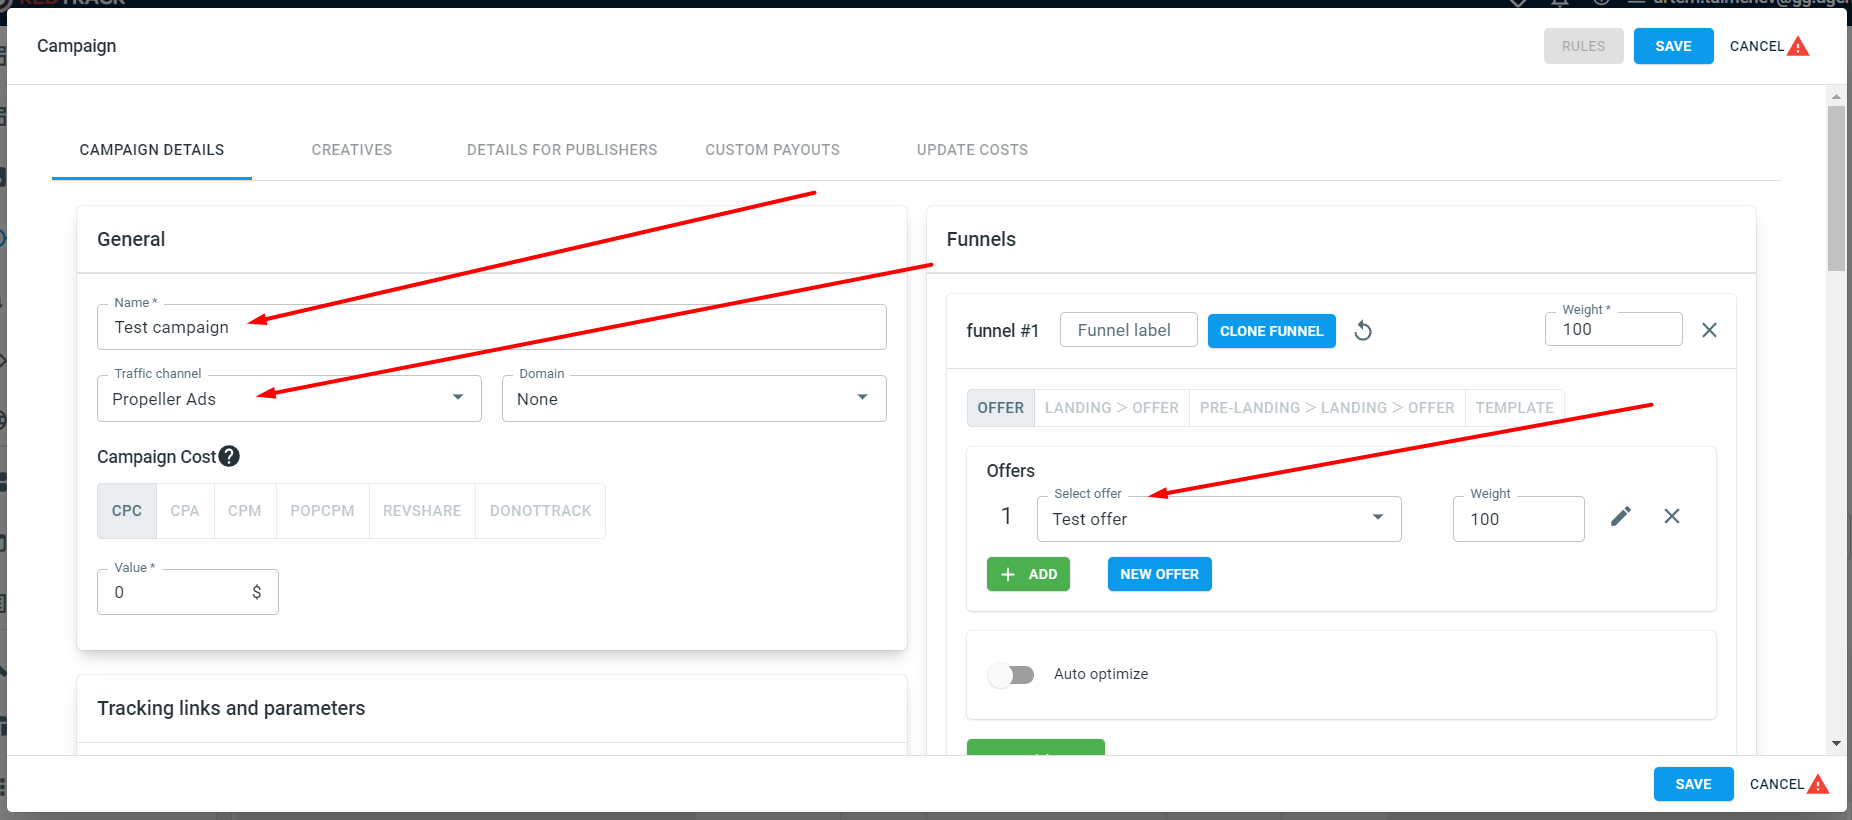
- In the created campaign, find the Campaign URL and save it:
Step 11. Go to Tools > Conversion tracking, and find the Postback URL:
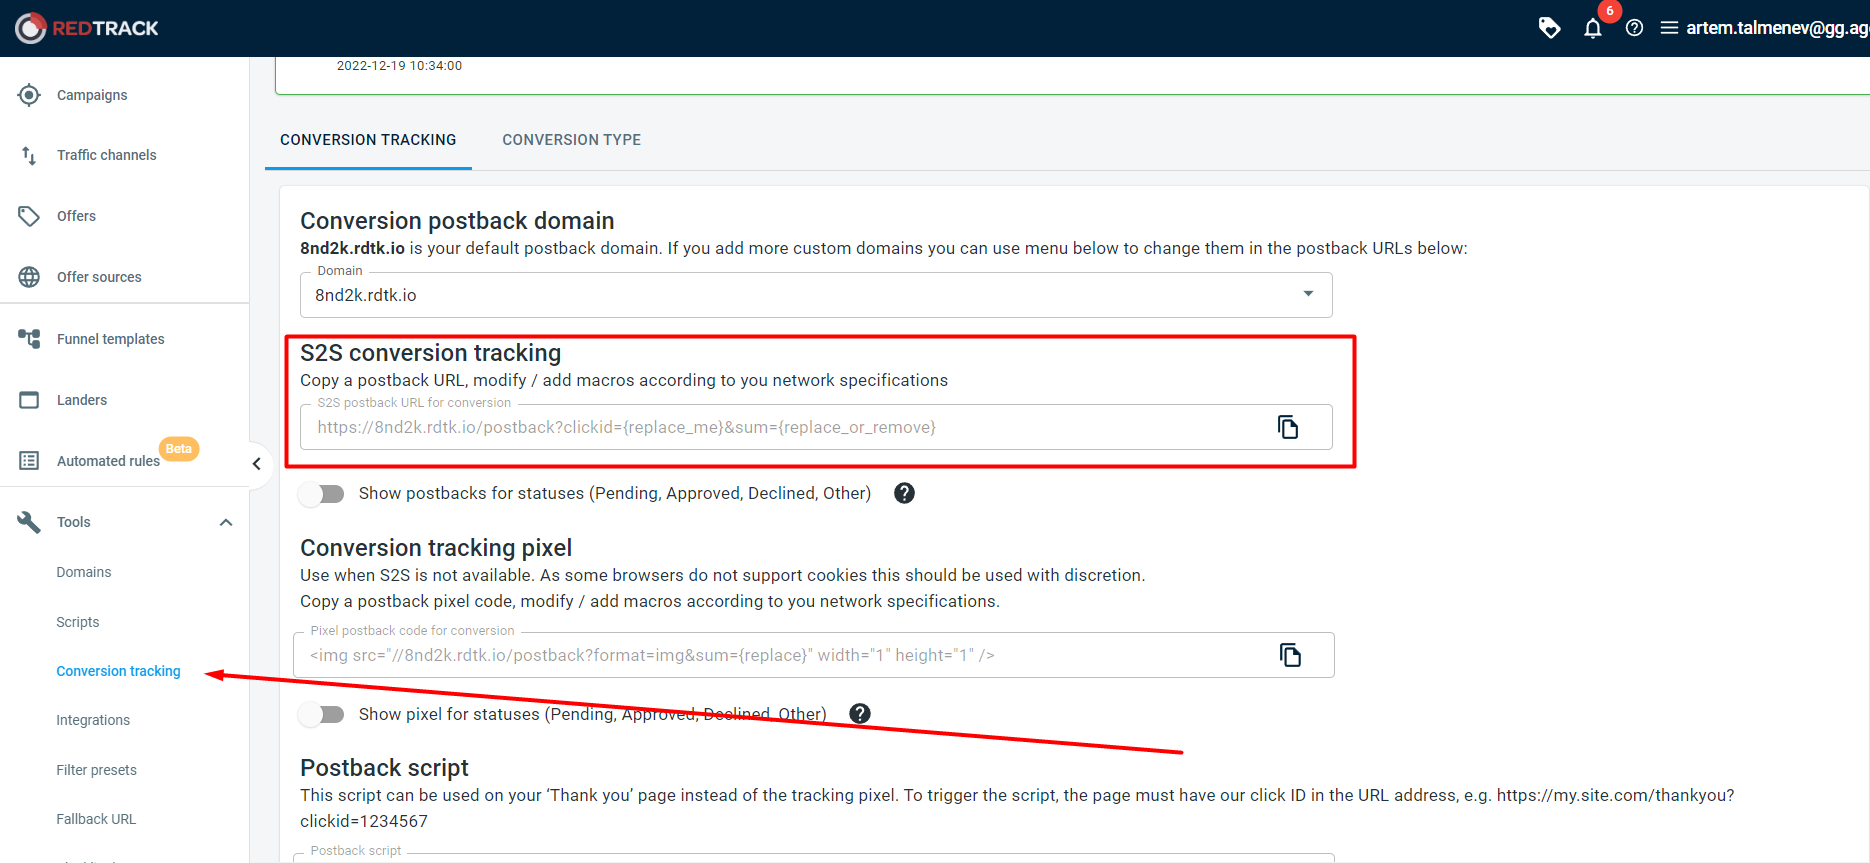
Save it as well.
Step 12. Paste the Postback URL, which you previously took from RedTrack, into the corresponding field on the Step 3 of the campaign at Golden Goose, and you also need to add parameters to this link:
- {p1} is a mandatory parameter responsible for passng the clickid.
- {profit} is a mandatory parameter responsible for passing the bid.
- The resulting link should look something like this:

An example of the resulting link:
https://8nd2k.rdtk.io/postback?clickid={p1}&sum={profit
- Attention:
- The domain in the link will be the one you have registered for the RedTrack tracker.
- Along with the {p1} and {profit} parameters, you can pass other optional parameters. Check the RedTrack’s instructions to learn how to track other campaign parameters, also see our instructions for setting up the parameters:
Step 13. After inserting the Postback URL, click the Test conversion button and the Test conversion field will open. In this field, insert the URL of the RedTrack campaign:

Step 14. Once you have inserted the Postback URL, set the parameters {p1} and {profit} and inserted the campaign URL, click on Send test conversion. If everything is fine, you will receive a positive notification. If something went wrong, you will get a negative notification. Double-check the links you inserted again. Possible causes:
- The Promo URL you inserted into the tracker is not the same as the one in the Golden Goose campaign.
- You put the {p1} and {profit} parameters at the wrong places in the Postback URL link.
- You made a mistake when copying the campaign URL from the tracker to the Golden Goose campaign.
Step 15. After a successful submission, you need to wait a while for the conversion to reach your tracker. This usually takes up to 10 minutes. If everything is set up correctly, you will see the conversion in your tracker’s Conversion section.
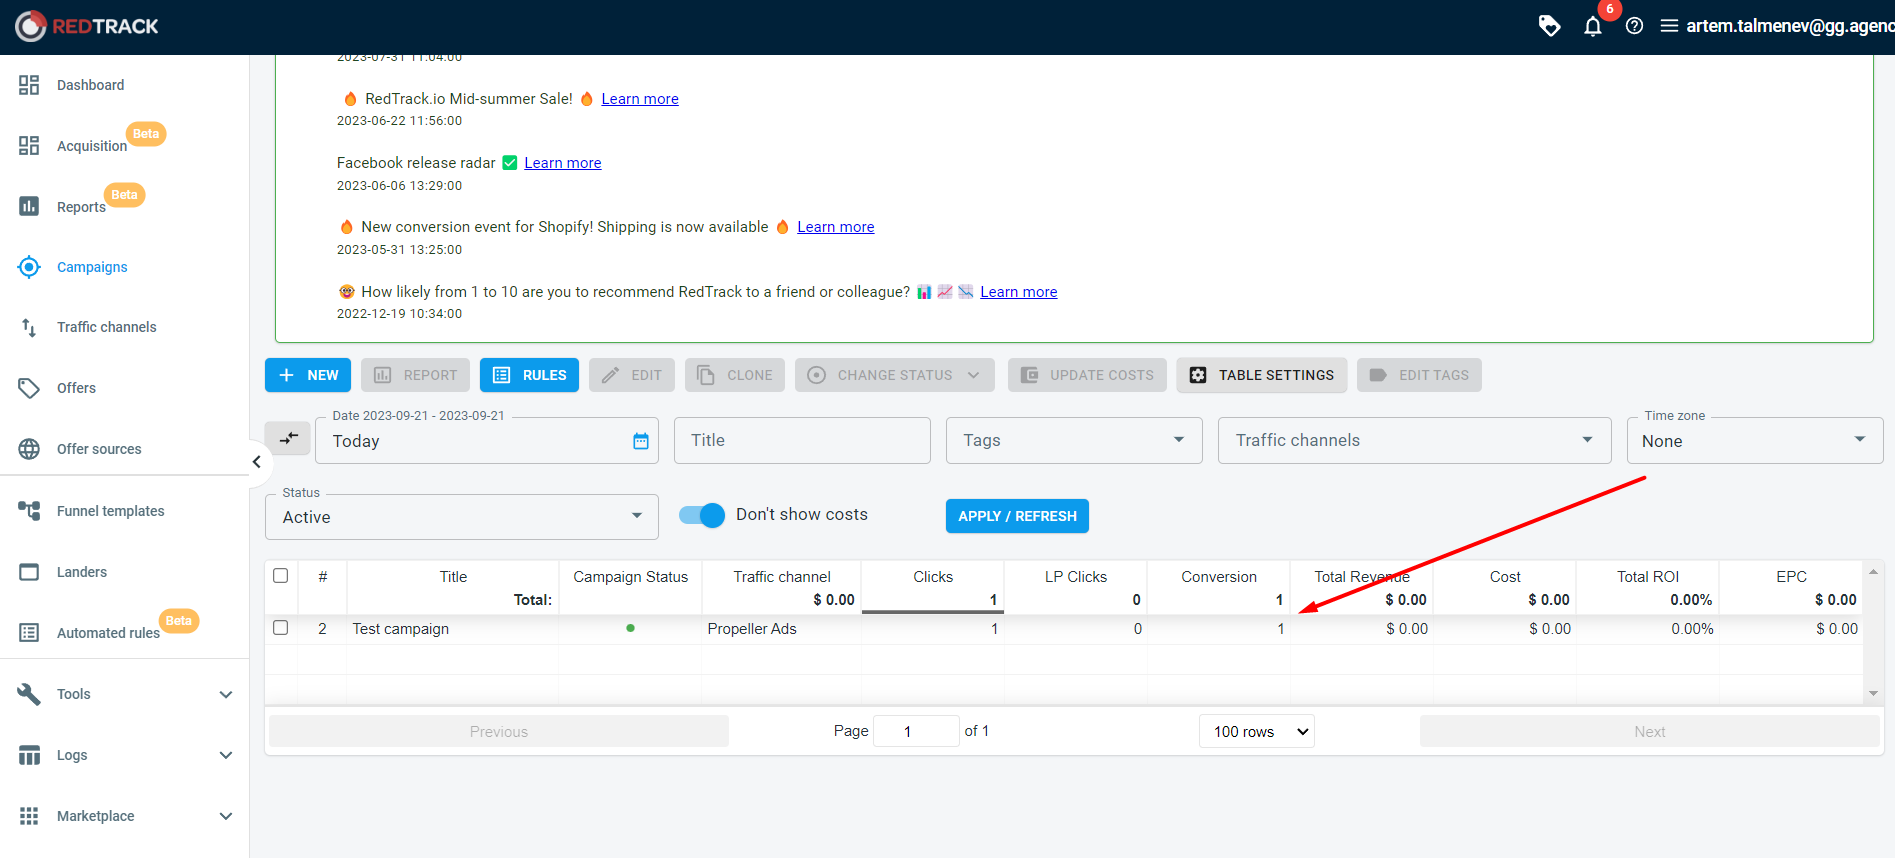
If the conversion did not reach the tracker, it means that something was missed during the setup. We recommend repeating the whole setup process again.
Please note: In this section, we’ve only covered sending a test conversion to verify that the tracker and campaign are set up correctly at Golden Goose.
For more in-depth traffic analysis and broader statistics transmission, you need to have an understanding of the tracker’s instructions and perform a more detailed configuration.


 Searching...